#ITPro in a DevOps world, Sr. Site Reliability Eng. @ MSFT. Montanan at ❤️! My tweets are my own & not a reflection of my employer. They are happy about that 👍
677 stories
·
2 followers

What is Azure Data Factory?

1 Comment

Azure Data Factory is a cloud-based data integration platform from Microsoft. It allows organizations to gather data from multiple sources and perform various data engineering operations in a code-free way.

For organizations struggling to manage and extract insights from exponentially increasing amounts of data, ADF can be a more efficient and cost-effective way to do that. In this post, I’ll explain in detail what Azure Data Factory is and how its major components work. It’s a featured-packed platform, but this guide will help you identify the best use cases for your business.

What is Azure Data Factory?

Azure Data Factory (ADF) is a cloud-based data pipeline orchestrator and data engineering tool. It’s part of Microsoft’s Azure cloud ecosystem and you can access it on the web.

There are currently two versions of ADF, version 1 and version 2. In this article, we’ll be covering the version 2 of the platform, which added support for more data integration scenarios.

A cloud-based data integration platform

Azure Data Factory is a fully-managed serverless data integration platform. It can help organizations build data-driven workflows by integrating data from multiple heterogeneous sources.

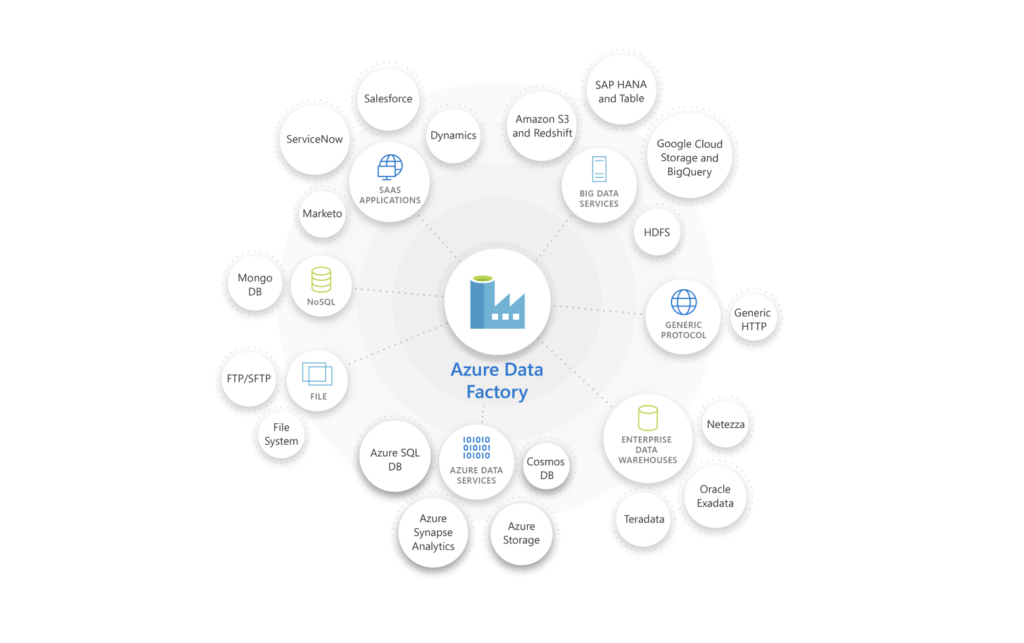
With over 100 different built-in and easy-to-maintain data connectors, you can build scalable and reusable pipelines that integrate different data sources, all without having to code. ADF lets you extract data from on-premises, hybrid, or multi-cloud sources. You can load all of it into your data warehouse or data stores for transformation.

ADF also provides an easy-to-use console to track data integrations and monitor overall system performance in real time. The platform also lets companies extend and rehost their Azure SQL database and SQL Server Integration Services (SSIS) in the cloud in a few clicks.

Azure Data Factory can integrate data from various platforms
Azure Data Factory can integrate data from various platforms (Image credit: Microsoft.com)

A data engineering service

On top of serving as a data integration platform, ADF is also a data engineering service. It allows organizations to extract value out of structured, unstructured, or semi-structured data in their data stores. By passing this data to downstream compute services, such as Azure Synapse Analytics, businesses can get insights on how to tackle operational challenges.

How does Azure Data Factory work?

To better understand how ADF works, let’s take a look at what happens during the data integration and data engineering stages.

Connecting and collecting data

Azure Data Factory offers over 100 different connectors to integrate data from on-premises, cloud, or hybrid sources. Outside of the Azure ecosystem, ADF supports the main Big Data sources including Amazon Redshift, Google BigQuery, Oracle Exadata, and Salesforce. As we previously mentioned, ADF also lets you create pipelines to extract data on specific intervals that can be scheduled.

Data consolidation

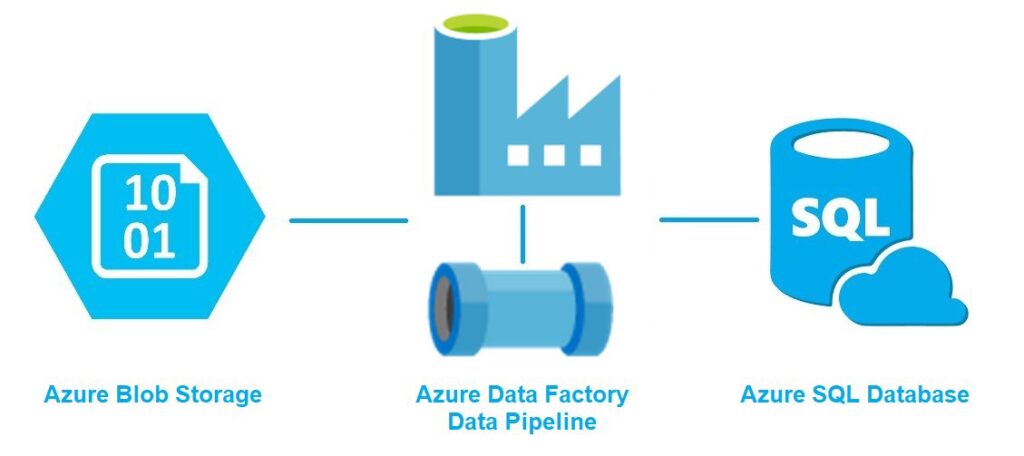
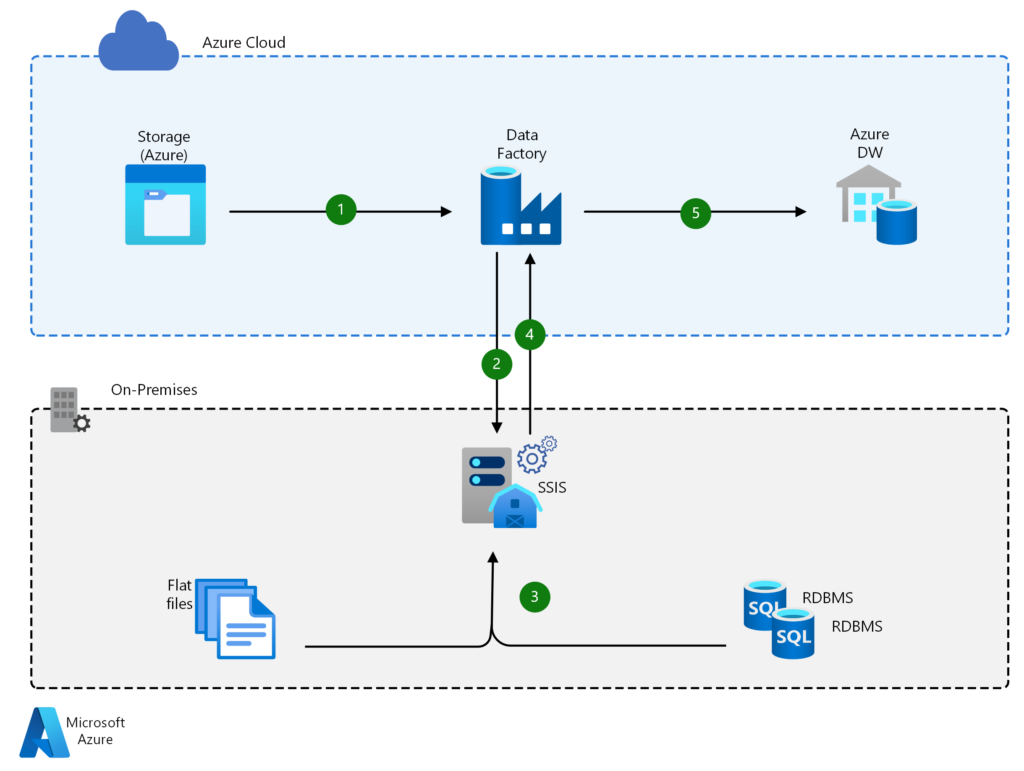
All data collected by ADF is organized in clusters. These clusters can either be stored in a single cloud-based repository or a data store like Azure Blob storage for downstream processing and analysis.

Data transformation

Once your extracted data has been transferred to a centralized data store, it can be transformed using different and configurable ETL (Extract, Transform, Load) and ELT (Extract, Load, Transform) solutions. You can use services like Azure Data Lake Analytics, Azure Synapse analytics, Azure HDInsight, Spark, Hadoop, and more.

Data publishing

After processing and transforming your data, it can now be published for consumption, archiving, or analytical purposes. ADF offers full support for Continuous Integration and Continuous Deployment (CI/CD) of your data pipelines using Azure DevOps and GitHub.

Monitoring

Lastly, you can use the Azure Monitor REST API or PowerShell to monitor your workflows and data pipelines connected to external data sources. ADF also generates logs that can be configured to set up alerts for errors in a workflow.

Core components of Azure Data Factory

Azure Data Factory relies on several core components that work together to let you create data integration pipelines in a code-free manner. We’re going to detail all of them here.

Pipelines and pipelines runs

In ADF, a pipeline is a group of activities designed to perform a specific task. A pipeline run is an instance of a pipeline execution.

Pipelines in ADF will allow you to group different activities in an efficient way. By creating multiple pipelines, you can also execute different tasks in parallel.

For example, you can create a pipeline to extract data from a source, transform that data into a particular format, and feed it to a different service.

Azure Data Factory Pipelines let you group different activities in an efficient way
Azure Data Factory Pipelines let you group different activities in an efficient way (Image credit: Microsoft.com)

Activities

An activity is a single step in an ADF pipeline. For example, it can be a connection to a data source, or copying data from one source to another.

ADF supports the following three types of activities:

  • Data movement activities
  • Data transformation Activities
  • Data control activities.

Datasets

A dataset is a general collection of data. In ADF, these datasets can be internal and external. They can be used to serve as an input (source) or output (destination) for your pipelines.

Linked services

Linked services are the connection strings that include the configuration and connection information needed for ADF to connect to external resources. Linked services can represent a data store such as an SQL Server database or an Azure Blob storage account. They can also represent a compute resource hosting the execution of an activity, such as an HDInsight Hadoop cluster.

Triggers

A trigger represents the unit of processing that determines when a pipeline or an activity within a pipeline should be executed. ADF allows you to create different types of triggers for different events.

Control flow

Control flow is what defines the execution of pipeline activities in ADF. You can chain activities in a sequence with For-each iterators, and you can also map data flows for sequential or parallel execution.

Benefits of Azure Data factory

Now that we’ve covered the top-level concepts of Azure Data Factory, we’re going to detail how this platform can be useful in the world of big data.

Easy data integrations

As we mentioned earlier, ADF offers more than 100 connectors for integrating data from various systems residing either on-premises or in the cloud.

ADF also lets you easily migrate and upgrade ETL workloads. This also applies to SQL Server Integration Services packages and other on-premises workloads you’d like to move to the cloud.

ADF offers more than 100 connectors for integrating data from various systems
ADF offers more than 100 connectors for integrating data from various systems (Image credit: Microsoft.com)

Code-free data transformation

With its intuitive GUI, Azure Data Factory allows you to easily import and transform data without having to write any code. Data transformation is a usually complex task requiring coding, scripting, and strong analytical abilities. However, ADF can handle complex data integration projects seamlessly.

Scalability

ADF can outperform several traditional ETL solutions that limit the amount and type of data you can process. With its time-slicing and control flow capabilities, ADF can migrate large volumes of data in minutes.

Cost efficiency

ADF provides ETL services in addition to its data integration capabilities. Therefore, you don’t have to pay the licensing fee associated with traditional ETL solutions. Moreover, ADF has a pay-as-you-use model, which mitigates the need for heavy upfront infrastructure costs.

Downstream services

Because ADF belongs to Microsoft’s Azure ecosystem, you can easily integrate it with downstream services such as Azure HDInsight, Azure Blob storage accounts, or Azure Data Lake analytics. In addition to seamless integrations with Azure services, ADF also offers regular security updates and technical support.

Azure Data Factory pricing

Pricing for ADF version 1 is based on the following factors:

  • Frequency of activities (e.g: the number of times you will perform data pulls or transformations).
  • Whether the activity is performed on-premises or on the cloud.
  • The state of your pipelines (active vs inactive).
  • The duration of activities.

However, the latest version of ADF (v2) allows users to create more complex data-driven workflows, and there are additional factors impacting the pricing. This includes:

  • Data pipeline orchestration and execution.
  • Data flow execution and the frequency of debugging.
  • The volume of data factory operations.

Pricing will also vary based on your region and the amount of Data Factory operations you need to perform. To estimate your costs, Microsoft provides a price calculation tool on the ADF product page.

Summary

Azure Data Factory is a robust platform for extracting and consolidating data from multiple heterogeneous sources. It can also be used as a data engineering platform to extract value out of different forms of data. For organizations dealing with large amounts of data, ADF can be a cost-effective solution for accelerating data transformation and unlocking new business insights.

Read the whole story
jshoq
583 days ago
reply
This is a great explanation of Azure Data Factory and how it works. Start here and move on to other posts about ADF.
Seattle, WA
Share this story
Delete

How to Install Active Directory PowerShell Module

1 Comment and 2 Shares

In this guide, we’ll show you how to install the Active Directory PowerShell module on almost any version of Windows. Installing the Active Directory (AD) module in PowerShell offers IT pros convenient and secure remote access to administer their AD environments, all without having to interactively log into their domain controllers.

Microsoft does not recommend the very prevalent and pervasive practice of interactively logging into Active Directory domain controllers (DCs) to work in Active Directory. It is a fundamental security risk and is inefficient, to name two cons. The best practice recommended by Microsoft is to remotely and securely use the Remote Server Administration Tools (RSAT) arsenal, including the Active Directory module for Windows PowerShell.

Install Active Directory PowerShell module

I will assist you in the installation of this rather powerful module on the varying Windows Server and Windows client operating systems. Hopefully, this guide will help you be more efficient, especially when it comes to PowerShell scripting and productivity gains.

Windows 7 (Windows Server 2008 R2)

Wait… hasn’t Windows 7 been out of support by Microsoft for around two and a half years (at the time of this writing)? Well, yes… you’re right. No one should be using Windows 7. But, as we are ALL aware, the vast majority of enterprises and SMBs certainly have some Windows 7 machines peeking from behind the curtains.

Download and install the Remote Server Administration Tools (RSAT) for Windows 7

First, you will need to download and install the Remote Server Administration Tools (RSAT) for Windows 7. Now, if you browse to this official Microsoft Documentation link, you’ll see that the RSAT for Windows 7 is discussed. But, try as you might, you won’t find a download link (It’s just not there…).

Long story short, Microsoft has removed any official downloads for the RSAT package for Windows 7. But, thanks to web.archive.org, the past has been retained in some way: You can download the package from this link.

Once you have it, go ahead and double-click on it, click Yes to install the update, and click Accept on the license terms.

Installing the RSAT on Windows 7

Once the installation is complete, you can move on to the next step.

Microsoft being all helpful and showing you how to proceed – how nice! 😉

Click Start -> Control Panel -> Programs, and then select ‘Turn Windows features on or off.’

We need to turn the RSAT on in Control Panel
Next, we need to enable the features in Windows

Drill down to expand Remote Server Administration Tools -> Role Administration Tools -> AD DS and AD LDS Tools and put a checkmark in ‘Active Directory Module for Windows PowerShell.’ Click OK.

We enable the Active Directory Module for Windows PowerShell
Finally selecting the exact feature we need!

The installation of the PowerShell module will then begin, and it can take several minutes.

The installation of the PowerShell module can take several minutes
Installation commencing

After that, it will delightfully disappear. Click Start -> Administrative Tools. At the top, you can click on Active Directory Module for Windows PowerShell.

The Active Directory module for PowerShell is now in the Administrative Tools folder
The new feature in the Administrative Tools folder

And there you have it. I just typed Get-ADUser -filter * to test and verify that the module works:

Get-ADUser -filter *

As you can see below, the module successfully connected to my Active Directory and output all user accounts from my lab. Sweet!

Running the 'Get-ADUser' from the new module
Running ‘Get-ADUser’ from the new module!

Windows Server 2008 R2

So, regarding installing this on Windows Server 2008 R2, the process is fairly similar. That’s not surprising as this version of Windows Server and Windows 7 share the same codebase.

Here are the differences and the steps you need to perform. Don’t worry, it’s nice and easy:

1. Go ahead and use the same download source for the RSAT Tools and install them.

2. Open Server Manager and click ‘Add features.’

3. Scroll down and find Remote Server Administration Tools -> Role Administration Tools -> AD DS and AD LDS Tools -> Active Directory module for Windows PowerShell.

You can also use the following PowerShell commands to install the module:

Import-Module ServerManager
Add-WindowsFeature RSAT-AD-PowerShell

Done!

Windows 10

On Windows 10, Microsoft made some major headway in reducing the time to install the RSAT tools and the various headaches that come along with it – they included them in the bits of the operating system and made them installable via Optional Features.

Click Start -> Settings -> Apps -> Optional Features.

The RSAT tools are available as an optional feature on Windows 10
How to start the installation of the RSAT Tools on Windows 10

Click the ‘Add a feature‘ button at the top, and then scroll down and check ‘RSAT: Active Directory Domain Services and Lightweight Directory Services Tools‘.

Finding 'RSAT: Active Directory Domain Services and Lightweight Directory Services Tools' in the list of optional features

Click the Install button and Windows 10 will then enable the feature.

Next, open the Windows 10 Start Menu, start typing in ‘module’ and you’ll find ‘Active Directory Module for Windows PowerShell.’ Click on it and you’re in!

Finding the Active Directory Module for Windows PowerShell in the Windows 10 Start Menu
Finding the new module in the Start Menu

I’ll run the same Get-ADUser command, the output looks familiar, doesn’t it? 🙂

Get-ADUser -filter *
Running Get-ADUser with the new module in Windows 10

Windows 11

The process on Windows 11 is very similar to Windows 10, only the layout of Settings has been updated with a few tweaks along the way. Let’s start this on one of my Windows 11 client VMs in my lab.

Click Start -> Settings -> Apps -> Optional features.

Finding Optional features in the Windows 11 Settings app
In Settings -> Apps, you’ll find Optional Features. Click this to install the AD Module

Click the ‘View features‘ button in the upper right corner, and then scroll down and find ‘RSAT: Active Directory Domain Services and Lightweight Directory Services Tools.’

Finding 'RSAT: Active Directory Domain Services and Lightweight Directory Services Tools.'
Click ‘View features’ to find and select the prize

Click Next and Windows 11 will install the feature for you. Then, as above, click the Start button again, start typing in ‘module’, and voila!

Using the Start Menu search to find our new module

Click ‘Active Directory Module for Windows PowerShell.’ We can use the same Get-ADUser command to confirm permissions locally and into our Active Directory domain.

Get-ADUser -filter *
We are 3 for 3 here. Very cool!

Windows Server 2012 R2 (Windows Server 2016, 2019, 2022, and Windows 8.1)

Because the install procedure is very similar between these Windows versions, I’ll cover one set of steps here. This will cover Windows Server 2012 R2, Windows Server 2016, Windows Server 2019, and Windows Server 2022 (this also applies very closely to Windows 8.1)

Reminder: Windows 8.1 goes out of support in January 2023 and Windows Server 2012/Windows Server 2012 R2 go out of support in October 2023. Be prepared!

Again, these Windows versions share the same codebase, so the steps are very similar. Let’s start out with a fresh, new, fully patched, Windows Server 2012 R2 member server in my Windows Server 2022 Active Directory Hyper-V lab.

A Windows Server 2012 R2 virtual machine
Windows Server 2012 R2 – Ready to go!

Let’s proceed to open Server Manager, then we’ll click on Add roles and features.

Adding Roles and Features to install RSAT Tools

Click Next a few times until you come to the ‘Select features‘ screen. As we’ve done previously, drill down to ‘Remote Server Administration Tools -> Role Administration Tools -> AD DS and AD LDS Tools -> and select Active Directory module for Windows PowerShell.’

Selecting the AD module for Windows PowerShell

On the next screen, click Install and we’re good!

We've done installing the AD module
Installation succeeded! Let’s fire her up!

Click Start -> Administrative Tools. Lo and behold, there it is. Open ‘Active Directory Module for Windows PowerShell.’ Let’s use the same Get-ADUser command again.

Get-ADUser -filter *
Running the Get-AdUser command
I know…I probably could have come up with some varying commands, but, you get the idea… 🙂

PowerShell Core 6.0/7.x

There are some other productivity features to help boost your efficiency as an IT Pro. This includes the method to install the Active Directory module on PowerShell Core 6.x/7.x. I’ll demonstrate this here on one of my Windows 10 version 21H2 VMs.

The first step is to install the RSAT tools as described above. You can follow the different steps mentioned in the ‘Windows 10’ section above.

Once you have the tools installed, you can install the latest version of PowerShell Core, which, as I write this, is PowerShell 7.2.5. You can find download links on this page.

Installing PowerShell (Core) 7.2.5

Click Next after opening the Setup wizard. On the ‘Optional Actions‘ screen, you can see the ‘Enable PowerShell remoting‘ option. Be sure to check that.

Selecting the 'Enable PowerShell remoting' feature
Selecting the ‘Enable PowerShell remoting’ feature

Click Next a few more times and click Install.

Installing PowerShell 7

After it’s installed, you can launch it from the Start menu as an Administrator.

Launching PowerShell (Core) 7 as an administrator

Because the modules installed essentially ‘follow’ the varying versions of PowerShell installed, I was able to use PowerShell (Core) 7.2.5 and run the Get-ADUser command natively.

Get-ADUser -filter *
Running Get-ADUser in PowerShell (Core) 7.2.5
Running Get-ADUser in PowerShell (Core) 7.2.5!

Using PowerShell remoting and interactive sessions

Another pretty powerful feature is being able to start a remote, interactive PowerShell session on your client computer while being connected to one of your domain controllers. Let me demonstrate how to do that with the following command:

Enter-PSsession ws16-dc1
Using Enter-PSsession to remotely run PowerShell on my domain controller
Using Enter-PSsession to remotely run PowerShell on my domain controller!

So, if your IT security folks don’t want the RSAT tools to be installed on your client machine for whatever reason, you can still accomplish your tasks in Active Directory with PowerShell without having to log in to your DCs. Pretty slick trick, right?

The next option we have is to use what’s called implicit remoting. This allows you to run the AD cmdlets from your local session. However, the commands are run remotely on the DC. Run the following commands to accomplish this.

The first command below starts a PowerShell session on my DC named ws16-dc1 :

$Session = New-PSSession -ComputerName ws16-dc1

The next command imports the Active Directory module from the remote session into our local session:

Import-Module -PSsession $session -name ActiveDirectory
Importing the AD Module from your DC

All the commands you run are literally being processed and running on your domain controller.

Exporting the remote AD module to a local module

The final task we can accomplish here is to export the AD cmdlets from your remote session to a local module. The sample commands below will accomplish this task by creating a local module in your Documents folder under PowerShell\Modules\RemoteAD.

$session = New-PSSession -ComputerName ws16-dc1
Export-PSSession -Session $session -Module ActiveDirectory -OutputModule RemoteAD
Remove-PSSession -Session $session
Import-Module RemoteAD
Exporting the remote Active Directory module from my DC to my local module

As is the case with the earlier steps we’ve run, we’re once again using implicit remoting, meaning all the cmdlets we use will be running remotely on the domain controller we specify. The local RemoteAD module makes a connection to the cmdlets on the DC.

Bonus tip: If you want to use this RemoteAD module on other client computers, you can copy the RemoteAD folder to the PowerShell Core module folder on other machines.

You can copy any modules listed here to other machines to auto-import them

The difference between these two methods is this – PowerShell only establishes a connection to the domain controller when you use an AD cmdlet the first time. It is a persistent connection. You don’t have to add the above commands to your script or profile because PowerShell will load them automatically. However, be advised that you may need to repeat these steps if and when you update the AD module on your domain controller.

Conclusion

It’s rather refreshing to discover that some procedures IT pros need to go through are quite straightforward. Thank you, Microsoft for keeping the overall process of installing this Active Directory module for PowerShell pretty streamlined and consistent over the last ten years! Every little bit helps.

Thanks to posts like these, if you need to grab your DeLorean and go back in time, you’ll have everything you need to get your job done. Thank you for reading, and please feel free to leave any comments or questions down in the comments section below.

Read the whole story
jshoq
637 days ago
reply
I find having the Active Directory module a necessary installation for management of legacy services that utilize service accounts from within Active Directory. This is helpful to get the module installed due to the additional installations the module needs.
Seattle, WA
Share this story
Delete

What is IP Address of Azure DevOps Build Agent and Set Firewall to Allow it

1 Comment and 2 Shares

If you are using the Microsoft-hosted Azure DevOps Build Agents, then you wont really have a reliable way to know what IP Address traffic from the Build Agent will originate from. This can be an issue when firewalls may be blocking the necessary traffic from your deployments to perform actions on your resources. Thankfully, the […]

The article What is IP Address of Azure DevOps Build Agent and Set Firewall to Allow it appeared first on Build5Nines.

Read the whole story
jshoq
641 days ago
reply
This is a super handy piece of code to keep restricted access to Azure services but allow it for Azure DevOps Pipelines or GitHub Actions. I plan to check this out for my own work.
Seattle, WA
Share this story
Delete

Netflix chooses Microsoft as an ad-tech partner for its coming ad-supported subscription service

1 Comment
Microsoft's ad platform will serve up all ads on the coming Netflix ad-supported subscription service, the pair have announced.
Read the whole story
jshoq
642 days ago
reply
Huh???
Seattle, WA
Share this story
Delete

Choose the right size for your workload with NVads A10 v5 virtual machines, now generally available

1 Comment

Visualization workloads entail a wide range of use cases: from computer-aided design (CAD), to virtual desktops, to high-end simulations. Traditionally, when running these graphics-heavy visualization workloads in the cloud, customers have been limited to purchasing virtual machines (VMs) with full GPUs, which increased costs and limited flexibility. So, in 2019, we introduced the first GPU-partitioned (GPU-P) virtual machine offering in the cloud. And today, your options just got wider. Introducing the general availability of NVads A10 v5 GPU accelerated virtual machines, now available in US South Central, US West2, US West3, Europe West, and Europe North regions. Azure is the first public cloud to offer GPU partitioning (GPU-P) on NVIDIA GPUs.

NVads A10 v5 virtual machines feature NVIDIA A10 Tensor Core GPUs, up to 72 AMD EPYC™ 74F3 vCPUs with clock frequencies up to 4.0 GHz, 880 GB of RAM, 256 MB of L3 cache, and simultaneous multithreading (SMT).

Pay-as-you-go, one-year and three-year Azure Reserved Instances, and Spot virtual machines pricing for Windows and Linux deployments are now available.

Flexible and affordable NVIDIA GPU-powered workstations in the cloud

Many enterprises today use NVIDIA vGPU technology on-premises to create virtual GPUs that can be shared across multiple virtual machines. We are always innovating to provide cloud infrastructure that makes it easy for customers to migrate to the cloud. By working with NVIDIA, we have implemented SR-IOV-based GPU partitioning that provides customers cost-effective options, similar to the vGPU profiles configured on-premises to pick the right-sized GPU-powered virtual machine for the workload. The SR-IOV-based GPU partitioning provides a strong, hardware-backed security boundary with predictable performance for each virtual machine.

With support for NVIDIA vGPU, customers can select from virtual machines with one-sixth of an A10 GPU and scale all the way up to two full A10 GPU configurations. This offers cost-effective entry-level and low-intensity GPU workloads on NVIDIA GPUs, while still giving customers the option to scale up to powerful full-GPU and multi-GPU processing power. Each GPU partition in the NVads A10 v5 series virtual machines includes the full NVIDIA RTX(GRID) license and customers can either deploy a single virtual workstation per user or offer multiple sessions using the Windows Enterprise multi-session operating system. Our customers love the integrated license validation feature as it simplifies the user experience by eliminating the need to deploy dedicated license server infrastructure and provides customers with a unified pricing model.

"The NVIDIA A10 GPU-accelerated instances in Azure with support for GPU partitioning are transformational for customers seeking cost-effective cloud options for graphics- and compute-intensive workloads. Now, enterprises can access powerful RTX Virtual Workstation instances accelerated by NVIDIA Ampere architecture-based A10 GPUs—sized to meet the performance requirements of creative and technical professionals working across industries such as manufacturing, architecture, and media and entertainment."— Anne Hecht, Senior Director, Product Marketing, NVIDIA.

NVIDIA RTX Virtual Workstations include the latest enhancements in AI, ray tracing, and simulation to enable incredible 3D designs, photorealistic simulations, and stunning visual effects—at faster speeds than ever.

Pick the right-sized GPU virtual machine for any workload

The NVads A10 v5 virtual machine series is designed to offer the right choice for any workload and provide the optimum configurations for both single-user and multi-session environments. The flexible GPU-partitioned virtual machine sizes enable a wide variety of graphics, video, and AI workloads—some of which weren’t previously possible. These include virtual production and visual effects, engineering design and simulation, game development and streaming, virtual desktops/workstations, and many more.

“In the world of CAD design, cost performance and flexibility are of prime importance for our users. Microsoft has completed extensive testing with Siemens NX and we found significant benefits in performance for multiple user scenarios. With GPU partitioning, Microsoft Azure can now enable multiple users to use Siemens NX and efficiently utilize GPU resources offering customers great performance at a reasonable hardware price point.”—George Rendell, Vice President Product Management, Siemens NX.

High performance for GPU-accelerated graphics applications

The NVIDIA A10 Tensor core GPUs in the NVads A10 v5 virtual machines offer great performance for graphics applications. The AMD EPYC™ 74F3 vCPUs with clock frequencies up to 4.0 GHz offer impressive performance for single-threaded applications.

Next steps

For more information on topics covered here, see the following documentation:

Read the whole story
jshoq
648 days ago
reply
This looks super interesting. I might have to look this one over as my DR Production machine in Azure for podcasts and streaming. Stay tuned...
Seattle, WA
Share this story
Delete

Improve outbound connectivity with Azure Virtual Network NAT

1 Comment

For many customers, making outbound connections to the internet from their virtual networks is a fundamental requirement of their Azure solution architectures. Factors such as security, resiliency, and scalability are important to consider when designing how outbound connectivity will work for a given architecture. Luckily, Azure has just the solution for ensuring highly available and secure outbound connectivity to the internet: Virtual Network NAT. Virtual Network NAT, also known as NAT gateway, is a fully managed and highly resilient service that is easy to scale and specifically designed to handle large-scale and variable workloads.

NAT gateway provides outbound connectivity to the internet through its attachment to a subnet and public IP address. NAT stands for network address translation, and as its name implies, when NAT gateway is associated to a subnet, all of the private IPs of a subnet’s resources (such as, virtual machines) are translated to NAT gateway’s public IP address. The NAT gateway public IP address then serves as the source IP address for the subnet’s resources. NAT gateway can be attached to a total of 16 IP addresses from any combination of public IP addresses and prefixes.

NAT gateway configuration example as described in the caption.

Figure 1: NAT gateway configuration with a subnet and a public IP address and prefix.

Customer is halted by connection timeouts while trying to make thousands of connections to the same destination endpoint

Customers in industries like finance, retail, or other scenarios that require leveraging large sets of data from the same source need a reliable and scalable method to connect to this data source.

In this blog, we’re going to walk through one such example that was made possible by leveraging NAT gateway.

Customer background

A customer collects a high volume of data to track, analyze, and ultimately make business decisions for one of their primary workloads. This data is collected over the internet from a service provider’s REST APIs, hosted in a data center they own. Because the data sets the customer is interested in may change daily, a recurring report can’t be relied on—they must request the data sets each day. Because of the volume of data, results are paginated and shared in chunks. This means that the customer must make tens of thousands of API requests for this one workload each day, typically taking from one to two hours. Each request correlates to its own separate HTTP connection, similar to their previous on-premises setup.

The starting architecture

In this scenario, the customer connects to REST APIs in the service provider’s on-premises network from their Azure virtual network. The service provider’s on-premises network sits behind a firewall. The customer started to notice that sometimes one or more virtual machines waited for long periods of time for responses from the REST API endpoint. These connections waiting for a response would eventually time out and result in connection failures.

Diagram showing traffic flow from the customer's Azure Infrastructure to on-premises data center.

Figure 2: The customer sends traffic from their virtual machine scale set (VMSS) in their Azure virtual network over the internet to an on-premises service provider’s data center server (REST API) that is fronted by a firewall.

The investigation

Upon deeper inspection with packet captures, it was found that the service provider’s firewall was silently dropping incoming connections from their Azure network. Since the customer’s architecture in Azure was specifically designed and scaled to handle the volume of connections going to the service provider’s REST APIs for collecting the data they required, this seemed puzzling. So, what exactly was causing the issue?

The customer, the service provider, and Microsoft support engineers collectively investigated why connections from the Azure network were being sporadically dropped, and made a key discovery. Only connections coming from a source port and IP address that were recently used (on the order of 20 seconds) were dropped by the service provider’s firewall. This is because the service provider’s firewall enforces a 20-second cooldown period on new connections coming from the same source IP and port. Any connections using a new source port on the same public IP were not impacted by the firewall’s cooldown timer. From these findings, it was concluded that source network address translation (SNAT) ports from the customer’s Azure virtual network were being reused too quickly to make new connections to the service provider’s REST API. When ports were reused before the cooldown timer completed, the connection would timeout and ultimately fail. The customer was then confronted with the question of, how do we prevent ports from being reused too quickly to make connections to the service provider’s REST API? Since the firewall’s cooldown timer could not be changed, the customer had to work within its constraints.

NAT gateway to the rescue

Based on this data, NAT gateway was introduced into the customer’s setup in Azure as a proof of concept. With this one change, connection timeout issues became a thing of the past.

NAT gateway was able to resolve this customer’s outbound connectivity issue to the service provider’s REST APIs for two reasons. One, NAT gateway selects ports at random from a large inventory of ports. The source port selected to make a new connection has a high probability of being new and therefore will pass through the firewall without issue. This large inventory of ports available to NAT gateway is derived from the public IPs attached to it. Each public IP address attached to NAT gateway provides 64,512 SNAT ports to a subnet’s resources and up to 16 public IP addresses can be attached to NAT gateway. That means a customer can have over 1 million SNAT ports available to a subnet for making outbound connections. Secondly, source ports being reused by NAT gateway to connect to the service provider’s REST APIs are not impacted by the firewall’s 20-second cooldown timer. This is because the source ports are set on their own cooldown timer by NAT gateway for at least as long as the firewall’s cooldown timer before they can be reused. See our public article on NAT gateway SNAT port reuse timers to learn more.

Stay tuned for our next blog where we’ll do a deep dive into how NAT gateway solves for SNAT port exhaustion through not only its SNAT port reuse behavior but also through how it dynamically allocates SNAT ports across a subnet’s resources.

Learn more

Through the customer scenario above, we learned how NAT gateway’s selection and reuse of SNAT ports proves why it is Azure’s recommended option for connecting outbound to the internet. Because NAT gateway is not only able to mitigate risk of SNAT port exhaustion but also connection timeouts through its randomized port selection, NAT gateway ultimately serves as the best option when connecting outbound to the internet from your Azure network.

To learn more about NAT gateway, see Design virtual networks with NAT gateway.

Read the whole story
jshoq
678 days ago
reply
This is pretty cool options for networking. I wonder if we will be able to use the NAT Gateway logs to do some investigation of outbound traffic for security uses.
JS
Seattle, WA
Share this story
Delete
Next Page of Stories