#ITPro in a DevOps world, Sr. Site Reliability Eng. @ MSFT. Montanan at ❤️! My tweets are my own & not a reflection of my employer. They are happy about that 👍
679 stories
·
2 followers

Dev Box Ready-To-Code Dev Box images template

1 Comment

At Ignite, Microsoft just announced Team customizations and imaging for Microsoft Dev Box. The goal for this feature is to improve developer productivity and happiness by reducing the time it takes to setup and maintain development environments. Team customizations began as an internal solution built by the One Engineering System (1ES) team called “ready to code” environments, and the benefits are a big part of the reason we have over 35,000 developers at Microsoft actively using Dev Box.

The original 1ES post covered how it all started and the amazing early results. Today we want to share some examples of how One Engineering System (1ES) built our “ready to code” environments and let you know how the preview feature for team customizations at Ignite will evolve to provide the same functionality directly in the Dev Box product.

For larger teams, representing these environments is extremely complex due to larger repositories, more tools (sometimes proprietary or legacy), and slower builds. Many customization steps are often similar across teams, but dedicating time and effort to create and maintain a sharable set of customizations is challenging. Making these customizations flexible enough to meet the needs of most teams in a large company like Microsoft is even harder. The 1ES solution is targeted at addressing these challenges, and we have worked very closely with the product team in developing team customizations based on what we learned. If you decide to use these examples you don’t need to worry about the future. As team customizations evolves and become public we will be migrating the 1ES deployment to Team customizations and will share a blog post on how you can do the same!

The biggest remaining differences between what was shared at Ignite and the 1ES approach shared in this post are 1ES templates conditional logic and image artifacts. Artifacts are effectively example scripts (or tasks in team customizations) on how to install and configure an environment built up from our CI/CD systems. The conditional logic in templates allow for very complex environments with a unique requirement but a common core to be represented with a much smaller and more maintainable script. Team customizations do support templates, and provide many of the same benefits:

  • Enhanced Security: Leveraging Azure Managed Identity ensures secure access to necessary assets during image creation. All artifacts placed on the image come from approved sources and are validated.
  • Improved Performance: Images are pre-configured with Dev Drive, configured with secure, performance-friendly Windows Defender settings.
  • Consistency and Reliability: The template provides smart defaults for creating standardized environments, reducing discrepancies in experience within and across teams. This means fewer “Works on my machine” cases.
  • Flexibility: Customizable to allow teams to specify repositories to clone, build configurations, default tool installations, and additional customizations.
  • Ease of Maintenance: Azure Bicep‘s power for authoring image definitions allows mixing simple static declarations with logic, enabling code reuse while hiding the template’s complexity in Bicep modules provided by 1ES.
  • Easy Refreshes: Microsoft developers are familiar with Azure Pipelines, and using them for managing image updates simplifies troubleshooting and maintenance.
  • Centralized Improvements Delivery: Building Dev Box environments based on the template allows a central engineering team, like 1ES, to deliver improvements to Ready-To-Code environments across the company.

Across Microsoft, teams create hundreds of Ready-To-Code images using the 1ES Dev Box Image Template. This requires the 1ES team to rigorously test updates to the template. Before completing each pull request, a small set of test images is built to cover most template features. As the first step of each template release, a larger set of images is created to mimic real image definitions from many customers. To further minimize the impact of potential regressions, updates are released in phases, starting with internal dogfooding using 1ES-owned Dev Box images. We use the Bicep Module Registry to distribute modules of the 1ES Dev Box Image Template to Microsoft teams, relying on module path tags to differentiate release phases. These tags also facilitate the quick delivery of hotfixes to a subset of customers when necessary.

To extend the benefits of the 1ES Dev Box Image Template beyond Microsoft, this post is an effort to share our approach with the broader community. We have created a ready to use sample from our internal template that builds Ready-To-Code environments for several real-life open-source repositories. This sample uses Azure Image Builder, allowing you to rely on extensive online resources for service configuration and troubleshooting. By following a similar templatized approach, you can build images for all your other needs. Here are key parts of the sample:

  • README.md: Detailed steps for how to set up your own image builds.
  • MSBuildSdks: Very simple image definition for a dotnet repo
  • eShop: More advanced Ready-To-Code image definition for a dotnet repo
  • Axios: Sample Ready-To-Code image definition for NPM repo
  • devbox-image: Main Bicep module for the sample template
  • build_images.yml: Sample Azure DevOps pipeline definition for building images
  • Artifacts: AKA customizers which are PowerShell script used for performing various image configuration tasks

The sample template offers the following key features:

  • Git Repositories: Easily declare a set of repositories to clone, restore packages, build, and create desktop shortcuts. The template natively supports MSBuild/dotnet projects and installs the necessary SDKs.
  • Image Identity: Automatically configure authentication using Azure Managed Identity for accessing Azure DevOps repositories and artifacts.
  • Dev Drive: Simplifies the setup of Dev Drive on Dev Box images, hiding the complexities involved.
  • Base Image: By default, the template uses Azure Marketplace image with Visual Studio 2022, Microsoft 365 Apps, and many common tools installed.
  • Default Tools: Ensures that essential tools are available and properly configured on the image, including VSCode, Visual Studio with extensions, Sysinternals Suite, Git, Azure Artifacts Credential Provider, and WinGet.
  • Smart Defaults: Optimizes performance and security for developer scenarios on Dev Box by configuring Windows OS, Microsoft Defender, enabling long paths, disabling Windows Reserved Storage and OneDrive.
  • Image Chaining: Allows the creation of base images that can be used as a faster starting point for derived images.
  • Compute Galleries: Publishes images to multiple compute galleries.
  • Image Build Environment: Configures SKU and disk size for the VM used during image building.

Below is a code snippet from the MSBuildSdks image definition. Despite its simplicity, this sample leverages the template to produce a Dev Box-compatible image, incorporating most of the features mentioned earlier. The repository is cloned and built seamlessly, thanks to the template’s comprehensive capabilities.

module devBoxImage '../modules/devbox-image.bicep' = {
  name: 'MSBuildSdks-${uniqueString(deployment().name, resourceGroup().name)}'
  params: {
    imageName: imageName
    isBaseImage: false
    galleryName: galleryName
    repos: [
      {
        Url: 'https://github.com/microsoft/MSBuildSdks'
        Kind: 'MSBuild'
      }
    ]

    imageIdentity: imageIdentity
    builderIdentity: builderIdentity
    artifactsRepo: artifactsRepo
  }
}

The 1ES Dev Box Image Template offers a great deal of flexibility, control, and troubleshooting options. However, this comes with a cost: teams are responsible for setting up and managing their image-building pipelines and need some knowledge of Azure. This could pose a steep learning curve for teams that lack experience with these technologies. The new Team customization feature shared at Ignite is much easier to get started with, but for larger organizations with more complex environments the benefits of the 1ES solution are significant. 1ES will continue to work closely with the Dev Box product group to integrate many of the 1ES Dev Box Image Template’s capabilities into the product itself, making the experience simpler while preserving as many benefits as possible and we are committed to helping our internal and external customer migrate when the time comes.

The post Dev Box Ready-To-Code Dev Box images template appeared first on Engineering@Microsoft.

Read the whole story
jshoq
11 days ago
reply
This capability takes the great product of Dev Box and advances it to a whole new level. We are using this and the capability of creating images that allow engineers to become immediately impact up a great asset. It also allows companies to bring on additional engineering assistance through consultants or through acquisition easier. Policies can be applied for security and for other business needs, like cost management. DevBox and 1ES Templates are a great way to get your engineers up and running quickly, securely, and consistently.
Seattle, WA
Share this story
Delete

Cybersecurity in Plain English: A Special Snowflake Disaster

1 Comment

Editor’s Note: This is an emergent story, and as such there may be more information available after the date of publication. 

Many readers have been asking: “What happened with Snowflake, and why is it making the news?” Let’s dive into this situation, as it is a little more complex than many other large-scale attacks we’ve seen recently.Noun abstract geometric snowflake 2143460 FF001C.

Snowflake is a data management and analytics service provider. What that essentially means is that when companies need to store, manage, and perform intelligence operations on massive amounts of data; Snowflake is one of the larger vendors that has services that allow that to happen. According to SoCRadar [[ https://socradar.io/overview-of-the-snowflake-breach/ ]], in late-May of 2024 Snowflake acknowledged that unusual activity had been observed across their platform since mid-April. While the activity indicated that something wasn’t right, the investigation didn’t find any threat activity being run against Snowflake’s systems directly. This was a bit of a confusing period, as usually you would see evidence that the vendor’s own systems were being attacked when you had strange activity going on across the vendor’s networks. 

Around the time of that disclosure, Santander Bank and Ticketmaster both reported that their data had been stolen, and was being held ransom by a threat actor. These are two enormous companies, and both reporting data breach activity within days of each other is an event that doesn’t happen often. Sure enough, when both companies investigated independently, they both came to the same conclusion – their data in Snowflake was what had been stolen. Many additional disclosures by both victim companies and the threat actors themselves – a group identified as UNC5537 by Mandiant [[ https://cloud.google.com/blog/topics/threat-intelligence/unc5537-snowflake-data-theft-extortion ]] occurred over the following weeks. Most recently, AT&T disclosed that they had suffered a massive breach of their data, with over 7 million customers impacted [[ https://about.att.com/story/2024/addressing-data-set-released-on-dark-web.html ]].

So, was Snowflake compromised? Not exactly. What happened her was that Snowflake did not require that customers use Multi-Factor Authentication (MFA) for users logging into the Snowflake platform. This allowed attackers who were able to successfully get malware on user desktops/devices to grab credentials; and then use those credentials to access and steal that customer’s data in Snowflake. This was primarily done by tricking a user into installing/running an “infostealer” malware, which allowed the attacker to see keystrokes, grab saved credentials, snoop on connections, etc. All the attacker needed to do was infect one machine that was being used by an authorized Snowflake user, and they could then get access to all the data that customer stored in Snowflake. Techniques like the use of password vaults (so there would be no keystrokes to spy on) and the use of MFA (which would require the user acknowledge a push alert or get a code on a different device) would be good defenses against this kind of attack, but Snowflake didn’t require these techniques to be in use for their customers.

Snowflake did not – at least technically – do anything wrong. They allow customers to use MFA and other login/credential security with their service, they just didn’t mandate it. They also did not have a quick way to turn on the requirement for MFA throughout a customer organization if that customer hadn’t started out making it mandatory for all Snowflake accounts they created. This is a point of contention with the cybersecurity community, but even though it is a violation of best practices it is not something that Snowflake purposely did incorrectly. Because of this, the attacks being seen are not the direct fault of Snowflake, but rather a result of Snowflake not forcing customers to use available security measures. Keep in mind that Snowflake has been around for some time now. When they first started, MFA was not an industry standard and customers starting to work with Snowflake back then were unlikely to have enabled it. 

Snowflake themselves have taken steps to address the issue. Most notably, they implemented a setting in their customer administration panel that lets an organization force the use of MFA for everyone in that company. If any users were not set up for MFA, they would need to configure it the next time they logged in. This is a good step in the right direction, but Snowflake did make a few significant errors in the way they handled the situation overall:

 – Snowflake did not enforce cybersecurity best practices by default, even for new customers. While they have been around long enough that their earlier customers may have started using the service before MFA was a standard security control, not getting those legacy customers to enable MFA was definitely a mistake. 

 – They also immediately tried to shift blame to customers who had suffered breaches. The customers in question were responsible for not implementing MFA and/or other security controls to safeguard their data; but attempting to blame the victim rarely works out in an vendor’s favor. In this case, the backlash from the security community was immediate and vocal. Especially when it came to light that there was no easy way to enable MFA across an entire customer, they lost the high ground quickly. 

 – That brings us to the next issue Snowflake faced: they didn’t make it easy to enable MFA. Most vendors these days allow for a quick way to enforce MFA across all users at that customer; with many vendors now having it be opt-out; meaning customer users will have to use MFA unless the customer organization opts-out of that feature. MFA was opt-in for Snowflake customers, even those signing up more recently when the use of MFA was considered a best practice by the cybersecurity community at large. With no quick switch or toggle to change that, many customers found themselves scrambling to identify each user of Snowflake within their organization and turn MFA on for each, one by one. 

Snowflake, in the end, was not responsible for the breaches multiple customers fell victim to. While that is true; their handling of the situation, attempt to blame the victims loudly and immediately, and lack of a critical feature set (to enforce MFA customer-wide) has created a situation where they are seen as at-fault, even when they’re not. A great case-study for other service providers who may want to plan for potential negative press events before they end up having to deal with them. 

If you are a Snowflake customer, you should immediately locate and then enable the switch to enforce MFA on all user accounts. Your users can utilize either Microsoft or Google Authenticator apps, or whatever Single Sign-On/IAM systems your organization uses. 

Read the whole story
jshoq
163 days ago
reply
Mike always does a great job explaining complex security situations for the average person. Give this a read to understand why the Snowflake situation happened and the lessons we can learn from it.
Seattle, WA
Share this story
Delete

What is Azure Data Factory?

1 Comment

Azure Data Factory is a cloud-based data integration platform from Microsoft. It allows organizations to gather data from multiple sources and perform various data engineering operations in a code-free way.

For organizations struggling to manage and extract insights from exponentially increasing amounts of data, ADF can be a more efficient and cost-effective way to do that. In this post, I’ll explain in detail what Azure Data Factory is and how its major components work. It’s a featured-packed platform, but this guide will help you identify the best use cases for your business.

What is Azure Data Factory?

Azure Data Factory (ADF) is a cloud-based data pipeline orchestrator and data engineering tool. It’s part of Microsoft’s Azure cloud ecosystem and you can access it on the web.

There are currently two versions of ADF, version 1 and version 2. In this article, we’ll be covering the version 2 of the platform, which added support for more data integration scenarios.

A cloud-based data integration platform

Azure Data Factory is a fully-managed serverless data integration platform. It can help organizations build data-driven workflows by integrating data from multiple heterogeneous sources.

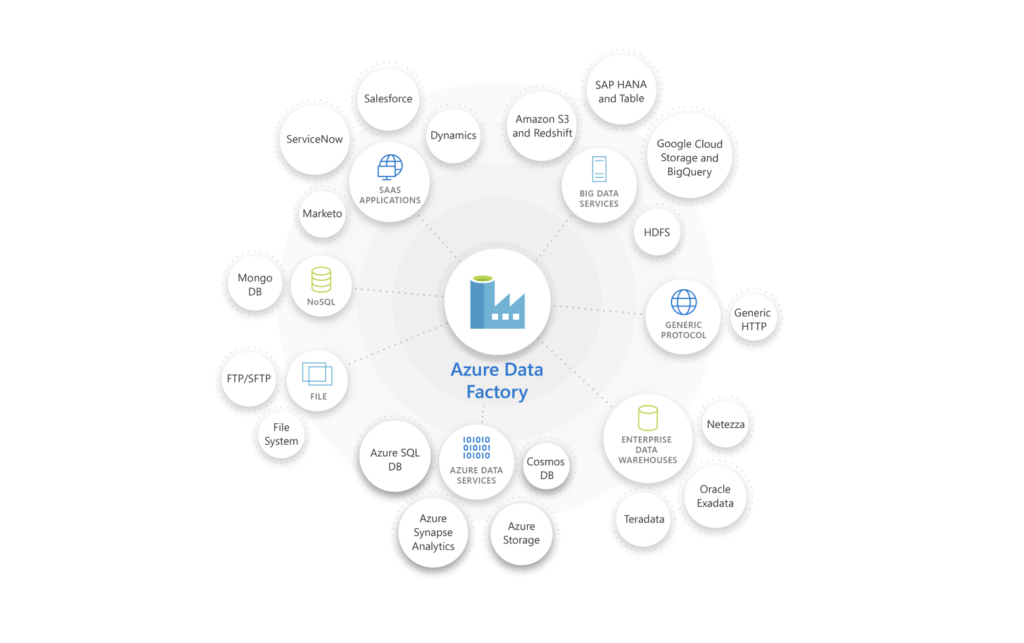
With over 100 different built-in and easy-to-maintain data connectors, you can build scalable and reusable pipelines that integrate different data sources, all without having to code. ADF lets you extract data from on-premises, hybrid, or multi-cloud sources. You can load all of it into your data warehouse or data stores for transformation.

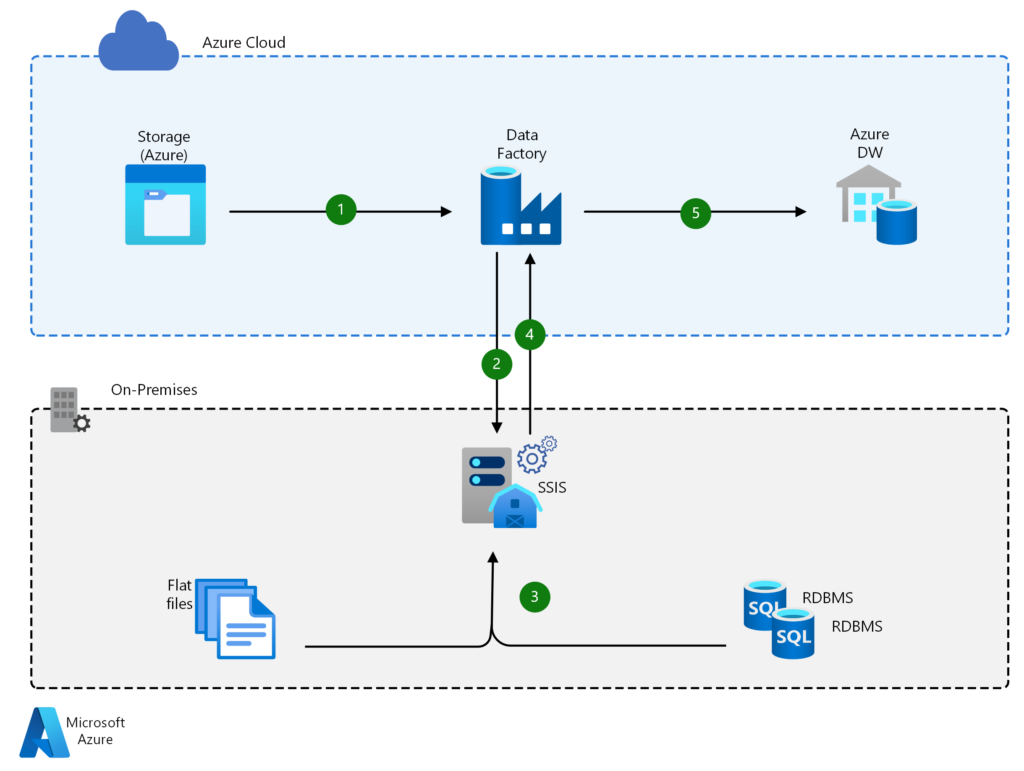
ADF also provides an easy-to-use console to track data integrations and monitor overall system performance in real time. The platform also lets companies extend and rehost their Azure SQL database and SQL Server Integration Services (SSIS) in the cloud in a few clicks.

Azure Data Factory can integrate data from various platforms
Azure Data Factory can integrate data from various platforms (Image credit: Microsoft.com)

A data engineering service

On top of serving as a data integration platform, ADF is also a data engineering service. It allows organizations to extract value out of structured, unstructured, or semi-structured data in their data stores. By passing this data to downstream compute services, such as Azure Synapse Analytics, businesses can get insights on how to tackle operational challenges.

How does Azure Data Factory work?

To better understand how ADF works, let’s take a look at what happens during the data integration and data engineering stages.

Connecting and collecting data

Azure Data Factory offers over 100 different connectors to integrate data from on-premises, cloud, or hybrid sources. Outside of the Azure ecosystem, ADF supports the main Big Data sources including Amazon Redshift, Google BigQuery, Oracle Exadata, and Salesforce. As we previously mentioned, ADF also lets you create pipelines to extract data on specific intervals that can be scheduled.

Data consolidation

All data collected by ADF is organized in clusters. These clusters can either be stored in a single cloud-based repository or a data store like Azure Blob storage for downstream processing and analysis.

Data transformation

Once your extracted data has been transferred to a centralized data store, it can be transformed using different and configurable ETL (Extract, Transform, Load) and ELT (Extract, Load, Transform) solutions. You can use services like Azure Data Lake Analytics, Azure Synapse analytics, Azure HDInsight, Spark, Hadoop, and more.

Data publishing

After processing and transforming your data, it can now be published for consumption, archiving, or analytical purposes. ADF offers full support for Continuous Integration and Continuous Deployment (CI/CD) of your data pipelines using Azure DevOps and GitHub.

Monitoring

Lastly, you can use the Azure Monitor REST API or PowerShell to monitor your workflows and data pipelines connected to external data sources. ADF also generates logs that can be configured to set up alerts for errors in a workflow.

Core components of Azure Data Factory

Azure Data Factory relies on several core components that work together to let you create data integration pipelines in a code-free manner. We’re going to detail all of them here.

Pipelines and pipelines runs

In ADF, a pipeline is a group of activities designed to perform a specific task. A pipeline run is an instance of a pipeline execution.

Pipelines in ADF will allow you to group different activities in an efficient way. By creating multiple pipelines, you can also execute different tasks in parallel.

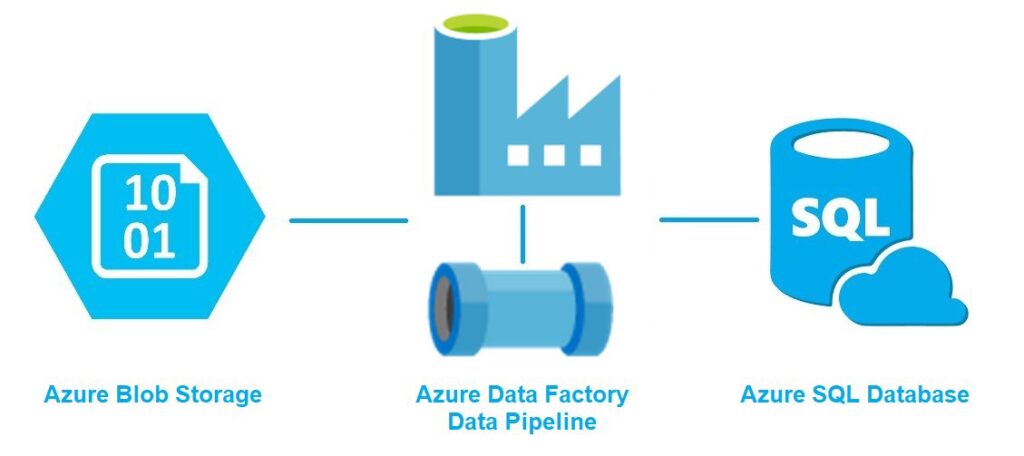
For example, you can create a pipeline to extract data from a source, transform that data into a particular format, and feed it to a different service.

Azure Data Factory Pipelines let you group different activities in an efficient way
Azure Data Factory Pipelines let you group different activities in an efficient way (Image credit: Microsoft.com)

Activities

An activity is a single step in an ADF pipeline. For example, it can be a connection to a data source, or copying data from one source to another.

ADF supports the following three types of activities:

  • Data movement activities
  • Data transformation Activities
  • Data control activities.

Datasets

A dataset is a general collection of data. In ADF, these datasets can be internal and external. They can be used to serve as an input (source) or output (destination) for your pipelines.

Linked services

Linked services are the connection strings that include the configuration and connection information needed for ADF to connect to external resources. Linked services can represent a data store such as an SQL Server database or an Azure Blob storage account. They can also represent a compute resource hosting the execution of an activity, such as an HDInsight Hadoop cluster.

Triggers

A trigger represents the unit of processing that determines when a pipeline or an activity within a pipeline should be executed. ADF allows you to create different types of triggers for different events.

Control flow

Control flow is what defines the execution of pipeline activities in ADF. You can chain activities in a sequence with For-each iterators, and you can also map data flows for sequential or parallel execution.

Benefits of Azure Data factory

Now that we’ve covered the top-level concepts of Azure Data Factory, we’re going to detail how this platform can be useful in the world of big data.

Easy data integrations

As we mentioned earlier, ADF offers more than 100 connectors for integrating data from various systems residing either on-premises or in the cloud.

ADF also lets you easily migrate and upgrade ETL workloads. This also applies to SQL Server Integration Services packages and other on-premises workloads you’d like to move to the cloud.

ADF offers more than 100 connectors for integrating data from various systems
ADF offers more than 100 connectors for integrating data from various systems (Image credit: Microsoft.com)

Code-free data transformation

With its intuitive GUI, Azure Data Factory allows you to easily import and transform data without having to write any code. Data transformation is a usually complex task requiring coding, scripting, and strong analytical abilities. However, ADF can handle complex data integration projects seamlessly.

Scalability

ADF can outperform several traditional ETL solutions that limit the amount and type of data you can process. With its time-slicing and control flow capabilities, ADF can migrate large volumes of data in minutes.

Cost efficiency

ADF provides ETL services in addition to its data integration capabilities. Therefore, you don’t have to pay the licensing fee associated with traditional ETL solutions. Moreover, ADF has a pay-as-you-use model, which mitigates the need for heavy upfront infrastructure costs.

Downstream services

Because ADF belongs to Microsoft’s Azure ecosystem, you can easily integrate it with downstream services such as Azure HDInsight, Azure Blob storage accounts, or Azure Data Lake analytics. In addition to seamless integrations with Azure services, ADF also offers regular security updates and technical support.

Azure Data Factory pricing

Pricing for ADF version 1 is based on the following factors:

  • Frequency of activities (e.g: the number of times you will perform data pulls or transformations).
  • Whether the activity is performed on-premises or on the cloud.
  • The state of your pipelines (active vs inactive).
  • The duration of activities.

However, the latest version of ADF (v2) allows users to create more complex data-driven workflows, and there are additional factors impacting the pricing. This includes:

  • Data pipeline orchestration and execution.
  • Data flow execution and the frequency of debugging.
  • The volume of data factory operations.

Pricing will also vary based on your region and the amount of Data Factory operations you need to perform. To estimate your costs, Microsoft provides a price calculation tool on the ADF product page.

Summary

Azure Data Factory is a robust platform for extracting and consolidating data from multiple heterogeneous sources. It can also be used as a data engineering platform to extract value out of different forms of data. For organizations dealing with large amounts of data, ADF can be a cost-effective solution for accelerating data transformation and unlocking new business insights.

Read the whole story
jshoq
838 days ago
reply
This is a great explanation of Azure Data Factory and how it works. Start here and move on to other posts about ADF.
Seattle, WA
Share this story
Delete

How to Install Active Directory PowerShell Module

1 Comment and 2 Shares

In this guide, we’ll show you how to install the Active Directory PowerShell module on almost any version of Windows. Installing the Active Directory (AD) module in PowerShell offers IT pros convenient and secure remote access to administer their AD environments, all without having to interactively log into their domain controllers.

Microsoft does not recommend the very prevalent and pervasive practice of interactively logging into Active Directory domain controllers (DCs) to work in Active Directory. It is a fundamental security risk and is inefficient, to name two cons. The best practice recommended by Microsoft is to remotely and securely use the Remote Server Administration Tools (RSAT) arsenal, including the Active Directory module for Windows PowerShell.

Install Active Directory PowerShell module

I will assist you in the installation of this rather powerful module on the varying Windows Server and Windows client operating systems. Hopefully, this guide will help you be more efficient, especially when it comes to PowerShell scripting and productivity gains.

Windows 7 (Windows Server 2008 R2)

Wait… hasn’t Windows 7 been out of support by Microsoft for around two and a half years (at the time of this writing)? Well, yes… you’re right. No one should be using Windows 7. But, as we are ALL aware, the vast majority of enterprises and SMBs certainly have some Windows 7 machines peeking from behind the curtains.

Download and install the Remote Server Administration Tools (RSAT) for Windows 7

First, you will need to download and install the Remote Server Administration Tools (RSAT) for Windows 7. Now, if you browse to this official Microsoft Documentation link, you’ll see that the RSAT for Windows 7 is discussed. But, try as you might, you won’t find a download link (It’s just not there…).

Long story short, Microsoft has removed any official downloads for the RSAT package for Windows 7. But, thanks to web.archive.org, the past has been retained in some way: You can download the package from this link.

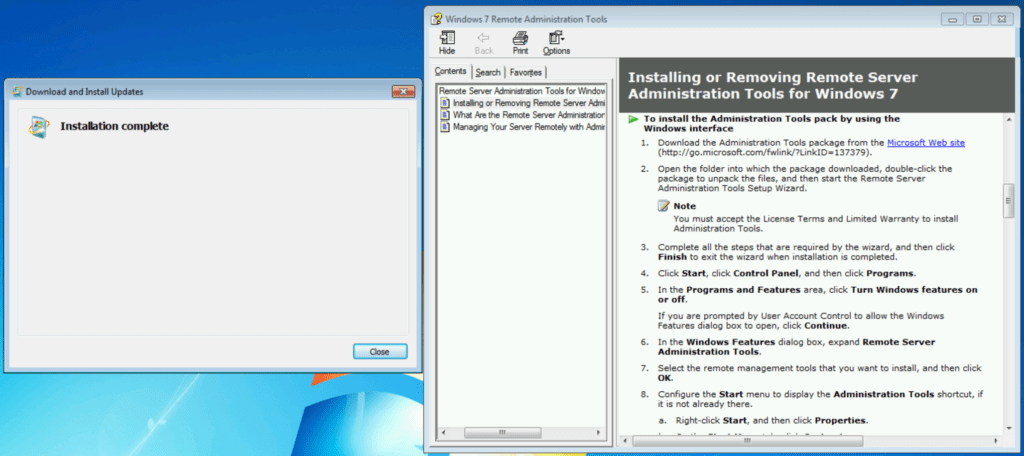
Once you have it, go ahead and double-click on it, click Yes to install the update, and click Accept on the license terms.

Installing the RSAT on Windows 7

Once the installation is complete, you can move on to the next step.

Microsoft being all helpful and showing you how to proceed – how nice! 😉

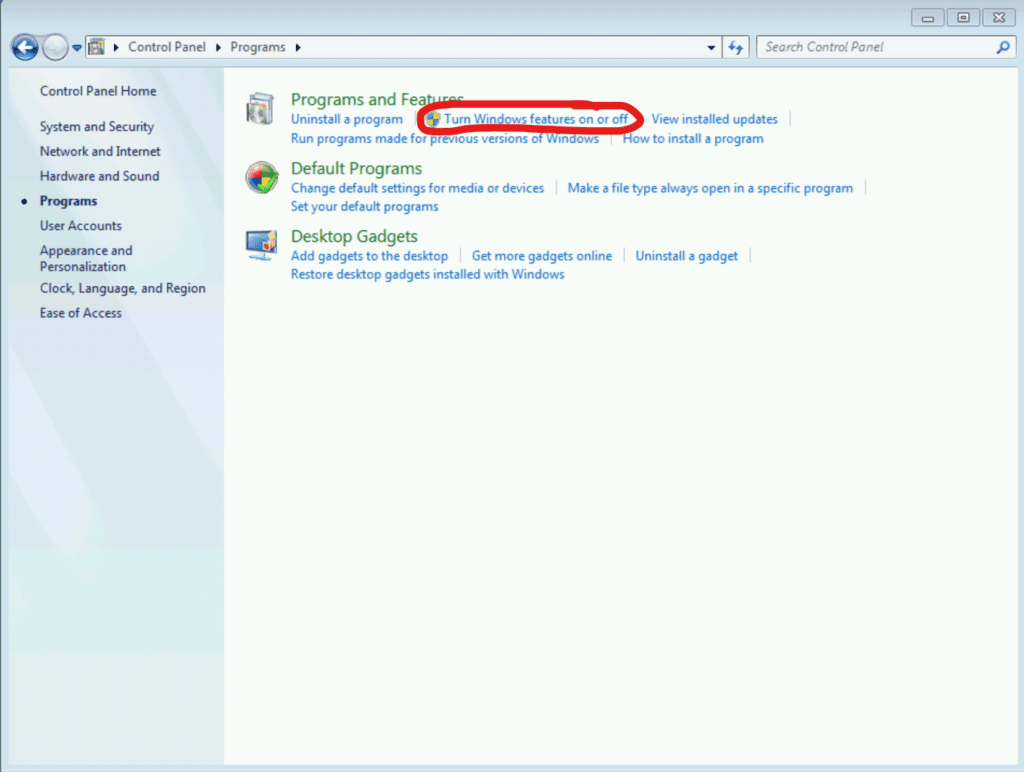
Click Start -> Control Panel -> Programs, and then select ‘Turn Windows features on or off.’

We need to turn the RSAT on in Control Panel
Next, we need to enable the features in Windows

Drill down to expand Remote Server Administration Tools -> Role Administration Tools -> AD DS and AD LDS Tools and put a checkmark in ‘Active Directory Module for Windows PowerShell.’ Click OK.

We enable the Active Directory Module for Windows PowerShell
Finally selecting the exact feature we need!

The installation of the PowerShell module will then begin, and it can take several minutes.

The installation of the PowerShell module can take several minutes
Installation commencing

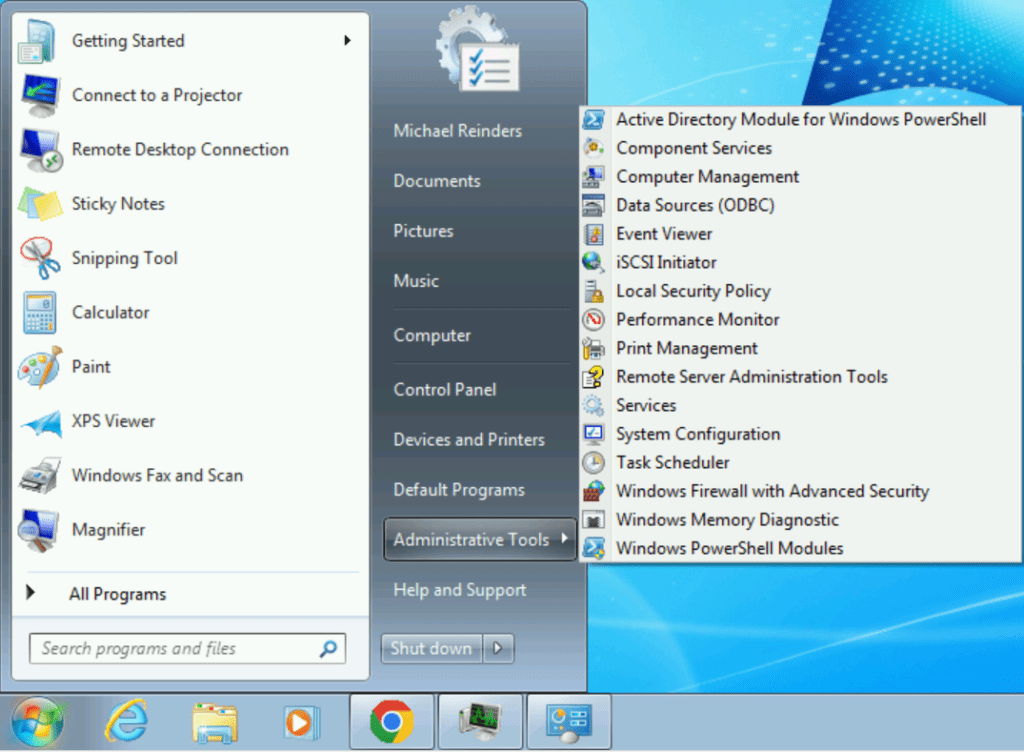
After that, it will delightfully disappear. Click Start -> Administrative Tools. At the top, you can click on Active Directory Module for Windows PowerShell.

The Active Directory module for PowerShell is now in the Administrative Tools folder
The new feature in the Administrative Tools folder

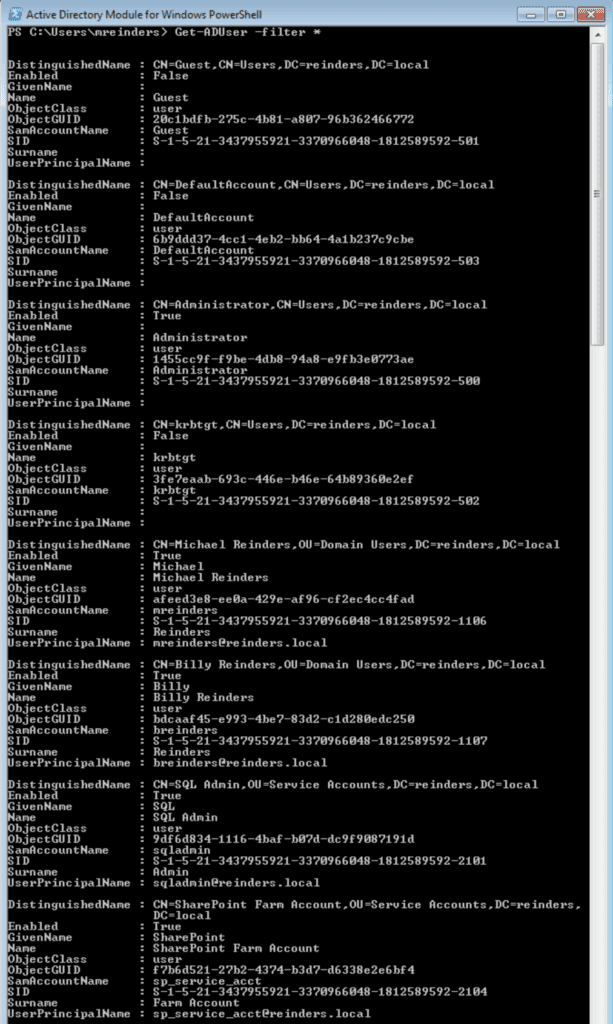
And there you have it. I just typed Get-ADUser -filter * to test and verify that the module works:

Get-ADUser -filter *

As you can see below, the module successfully connected to my Active Directory and output all user accounts from my lab. Sweet!

Running the 'Get-ADUser' from the new module
Running ‘Get-ADUser’ from the new module!

Windows Server 2008 R2

So, regarding installing this on Windows Server 2008 R2, the process is fairly similar. That’s not surprising as this version of Windows Server and Windows 7 share the same codebase.

Here are the differences and the steps you need to perform. Don’t worry, it’s nice and easy:

1. Go ahead and use the same download source for the RSAT Tools and install them.

2. Open Server Manager and click ‘Add features.’

3. Scroll down and find Remote Server Administration Tools -> Role Administration Tools -> AD DS and AD LDS Tools -> Active Directory module for Windows PowerShell.

You can also use the following PowerShell commands to install the module:

Import-Module ServerManager
Add-WindowsFeature RSAT-AD-PowerShell

Done!

Windows 10

On Windows 10, Microsoft made some major headway in reducing the time to install the RSAT tools and the various headaches that come along with it – they included them in the bits of the operating system and made them installable via Optional Features.

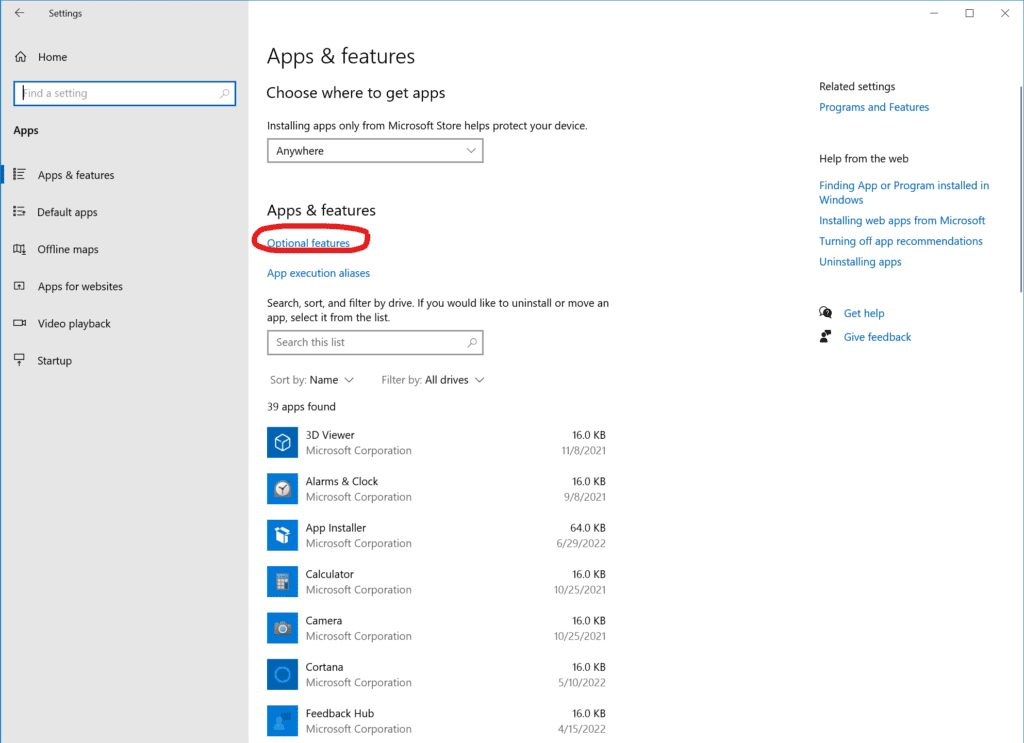
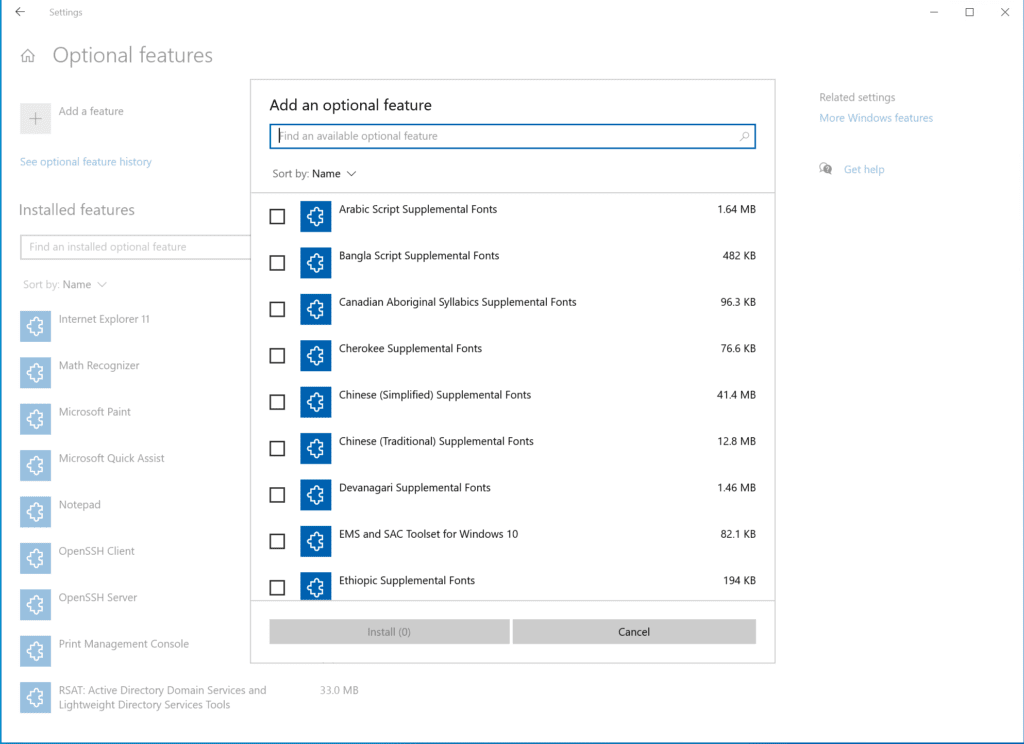
Click Start -> Settings -> Apps -> Optional Features.

The RSAT tools are available as an optional feature on Windows 10
How to start the installation of the RSAT Tools on Windows 10

Click the ‘Add a feature‘ button at the top, and then scroll down and check ‘RSAT: Active Directory Domain Services and Lightweight Directory Services Tools‘.

Finding 'RSAT: Active Directory Domain Services and Lightweight Directory Services Tools' in the list of optional features

Click the Install button and Windows 10 will then enable the feature.

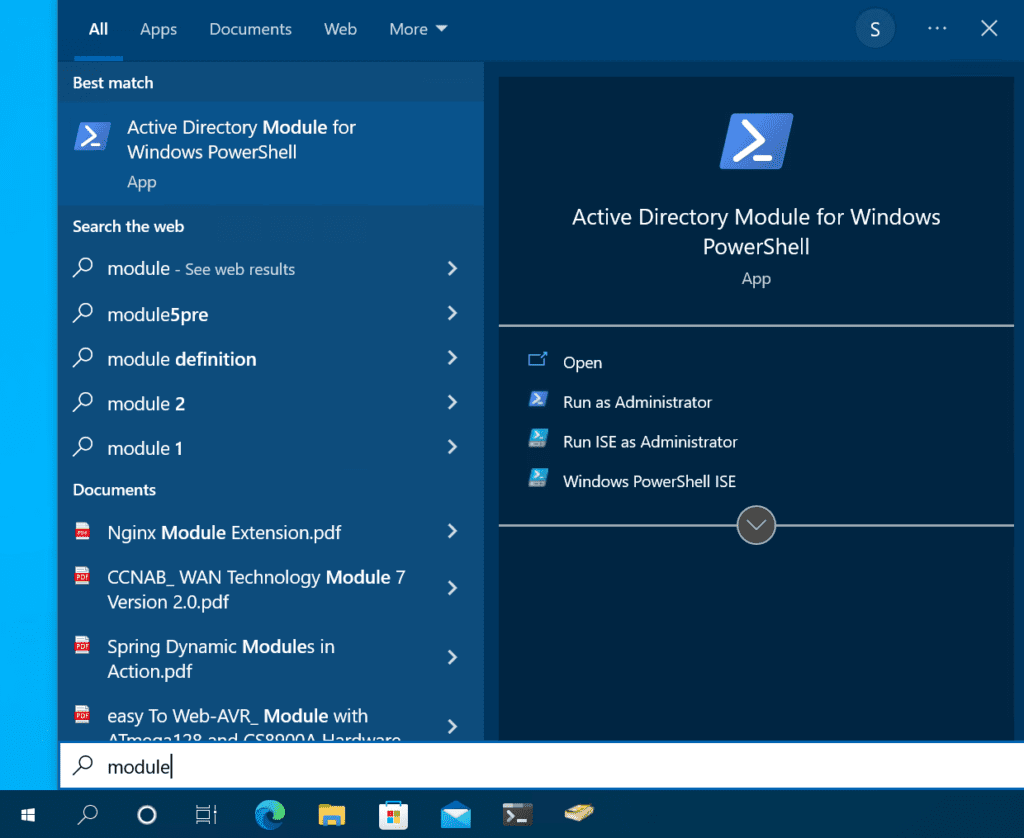
Next, open the Windows 10 Start Menu, start typing in ‘module’ and you’ll find ‘Active Directory Module for Windows PowerShell.’ Click on it and you’re in!

Finding the Active Directory Module for Windows PowerShell in the Windows 10 Start Menu
Finding the new module in the Start Menu

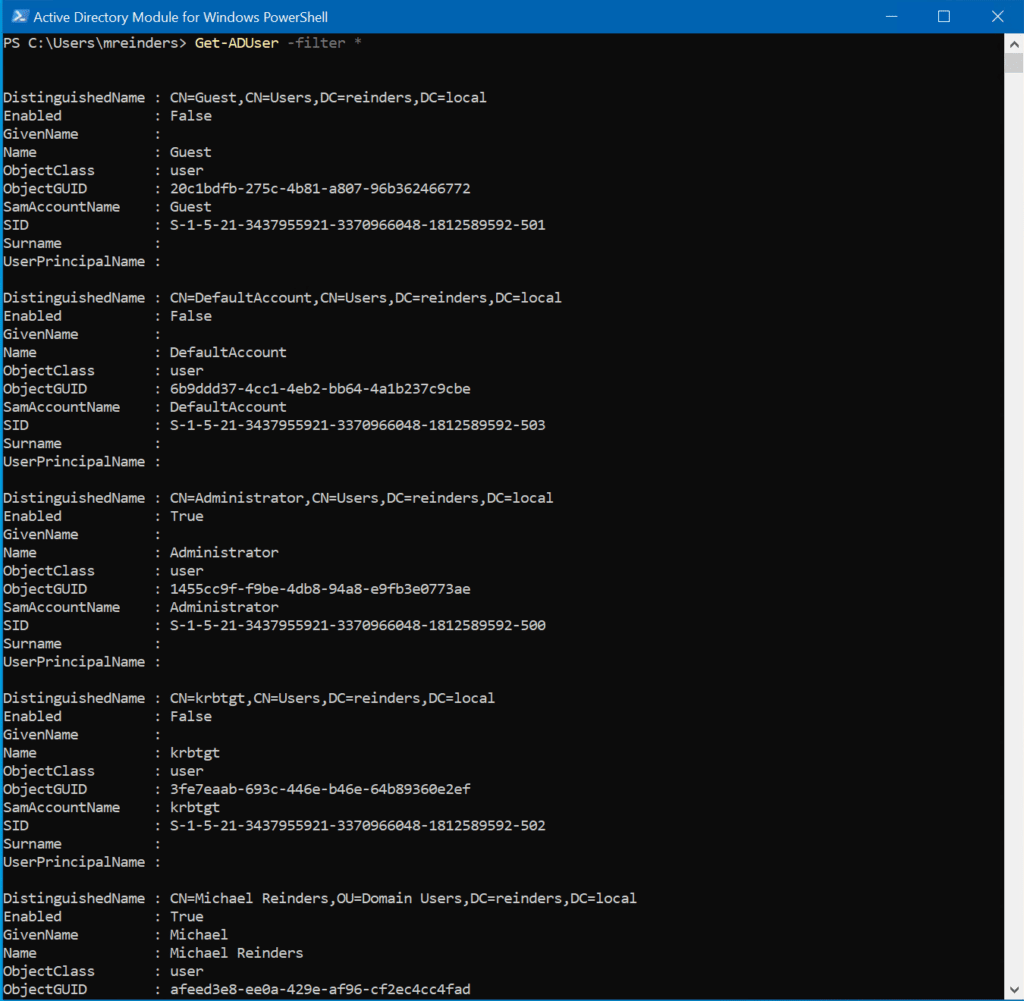
I’ll run the same Get-ADUser command, the output looks familiar, doesn’t it? 🙂

Get-ADUser -filter *
Running Get-ADUser with the new module in Windows 10

Windows 11

The process on Windows 11 is very similar to Windows 10, only the layout of Settings has been updated with a few tweaks along the way. Let’s start this on one of my Windows 11 client VMs in my lab.

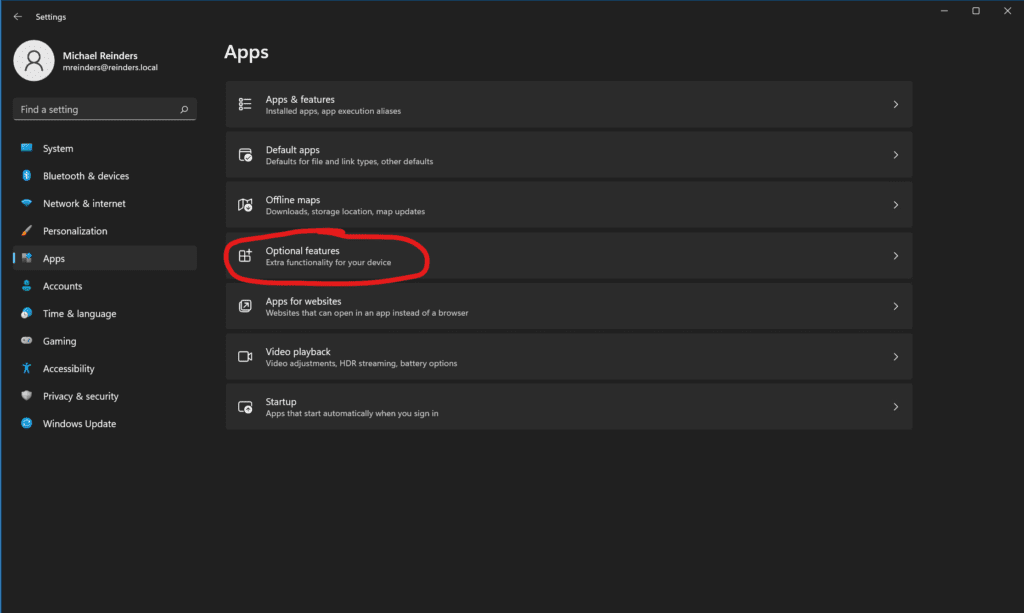
Click Start -> Settings -> Apps -> Optional features.

Finding Optional features in the Windows 11 Settings app
In Settings -> Apps, you’ll find Optional Features. Click this to install the AD Module

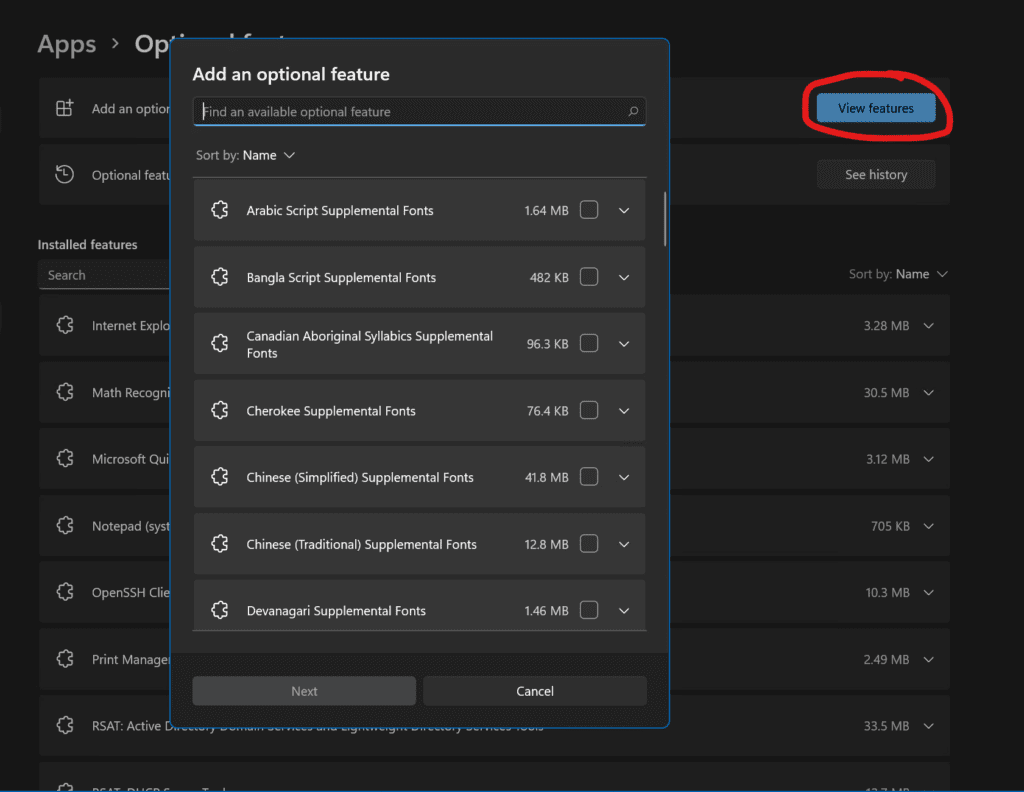
Click the ‘View features‘ button in the upper right corner, and then scroll down and find ‘RSAT: Active Directory Domain Services and Lightweight Directory Services Tools.’

Finding 'RSAT: Active Directory Domain Services and Lightweight Directory Services Tools.'
Click ‘View features’ to find and select the prize

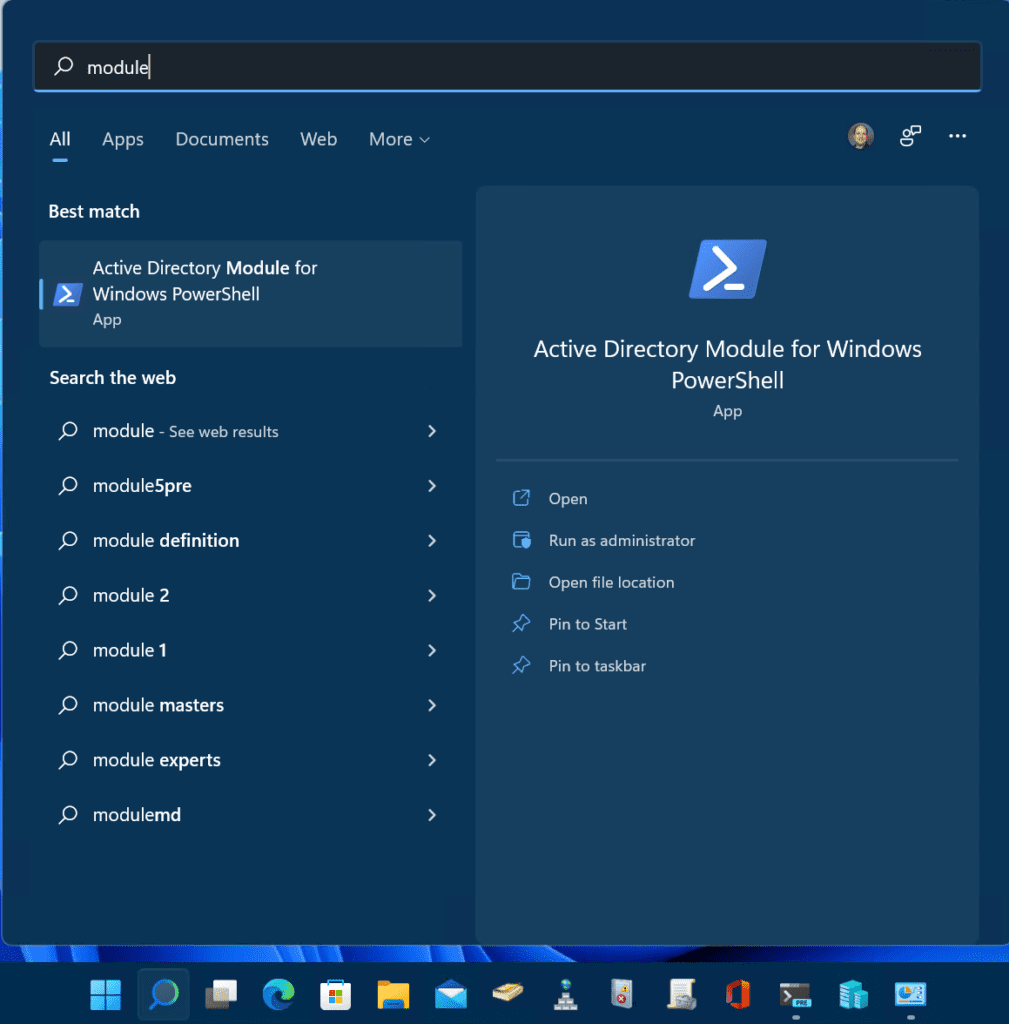
Click Next and Windows 11 will install the feature for you. Then, as above, click the Start button again, start typing in ‘module’, and voila!

Using the Start Menu search to find our new module

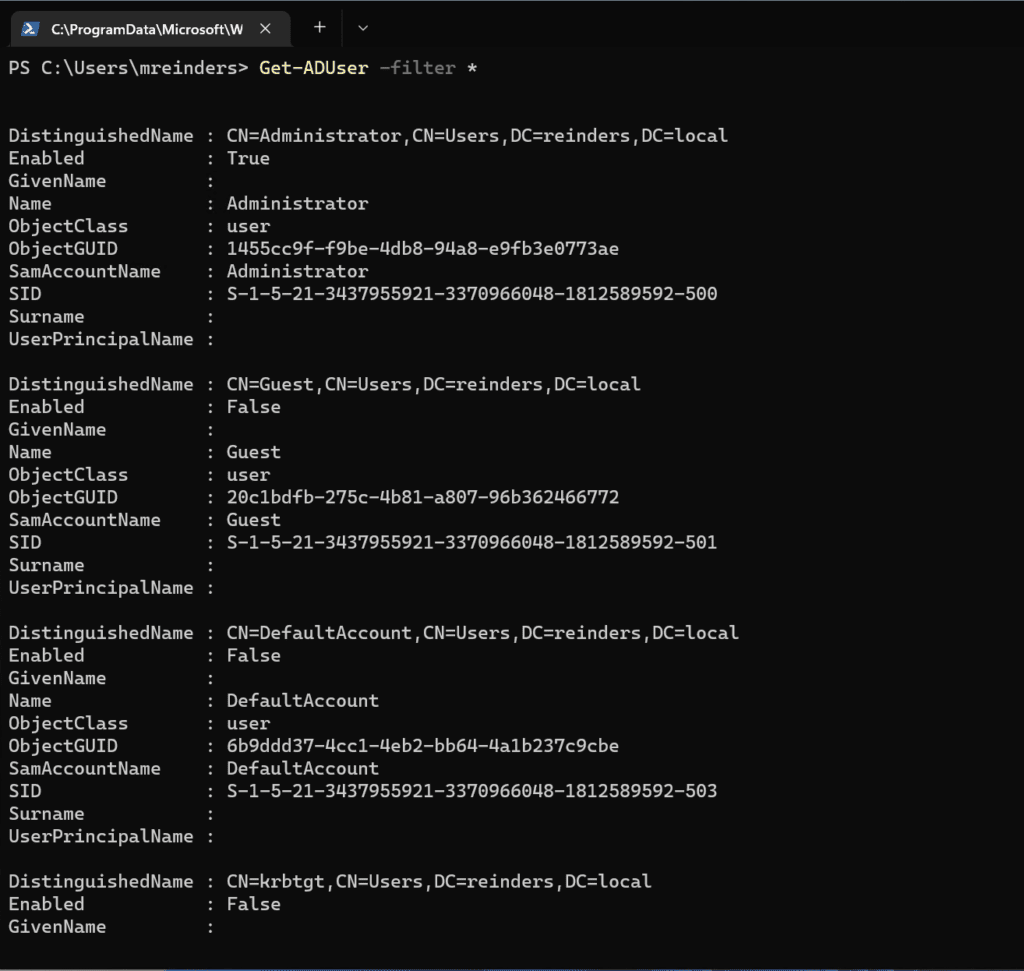
Click ‘Active Directory Module for Windows PowerShell.’ We can use the same Get-ADUser command to confirm permissions locally and into our Active Directory domain.

Get-ADUser -filter *
We are 3 for 3 here. Very cool!

Windows Server 2012 R2 (Windows Server 2016, 2019, 2022, and Windows 8.1)

Because the install procedure is very similar between these Windows versions, I’ll cover one set of steps here. This will cover Windows Server 2012 R2, Windows Server 2016, Windows Server 2019, and Windows Server 2022 (this also applies very closely to Windows 8.1)

Reminder: Windows 8.1 goes out of support in January 2023 and Windows Server 2012/Windows Server 2012 R2 go out of support in October 2023. Be prepared!

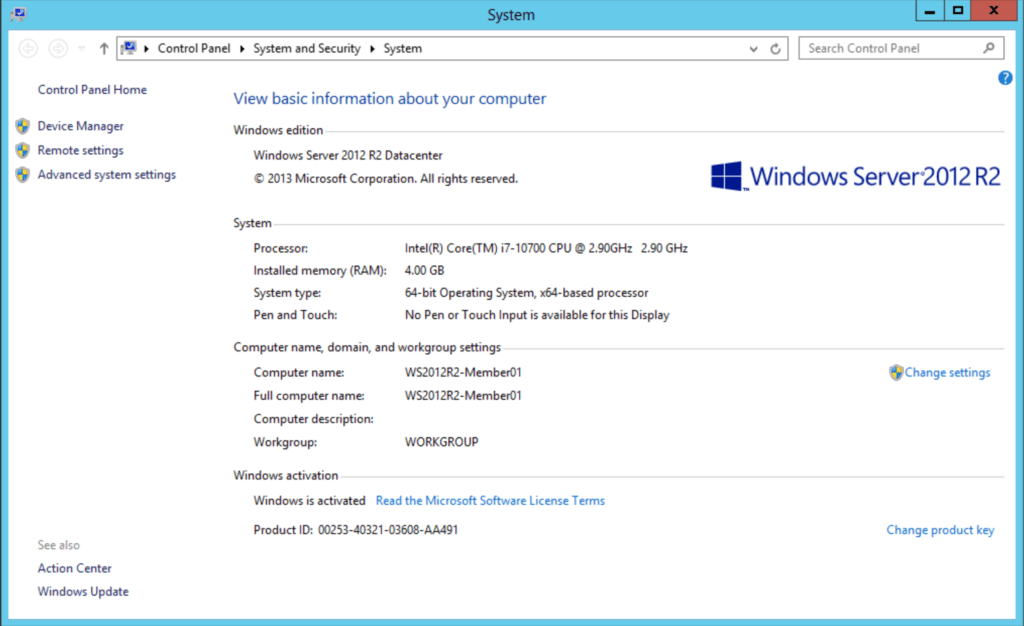
Again, these Windows versions share the same codebase, so the steps are very similar. Let’s start out with a fresh, new, fully patched, Windows Server 2012 R2 member server in my Windows Server 2022 Active Directory Hyper-V lab.

A Windows Server 2012 R2 virtual machine
Windows Server 2012 R2 – Ready to go!

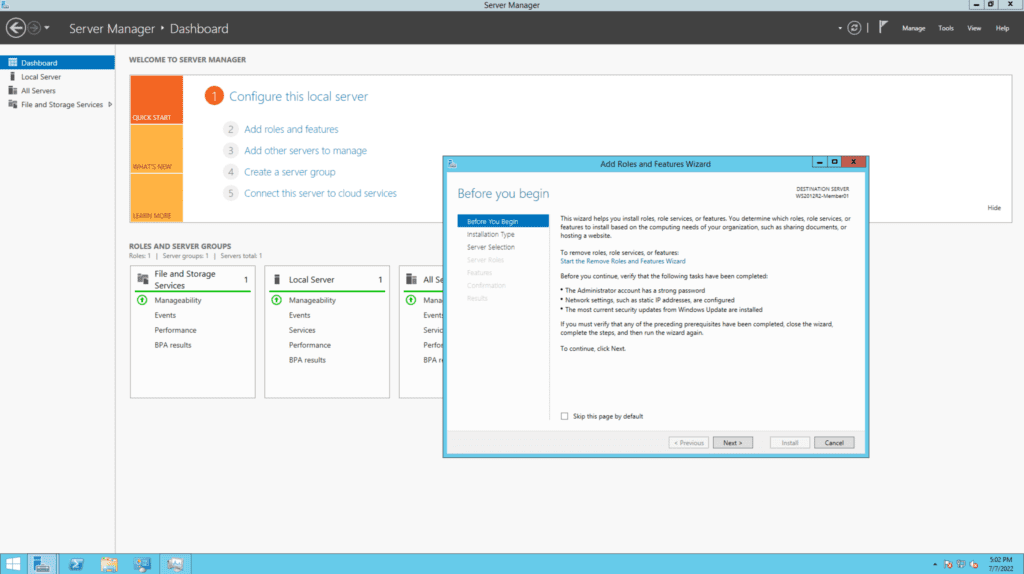
Let’s proceed to open Server Manager, then we’ll click on Add roles and features.

Adding Roles and Features to install RSAT Tools

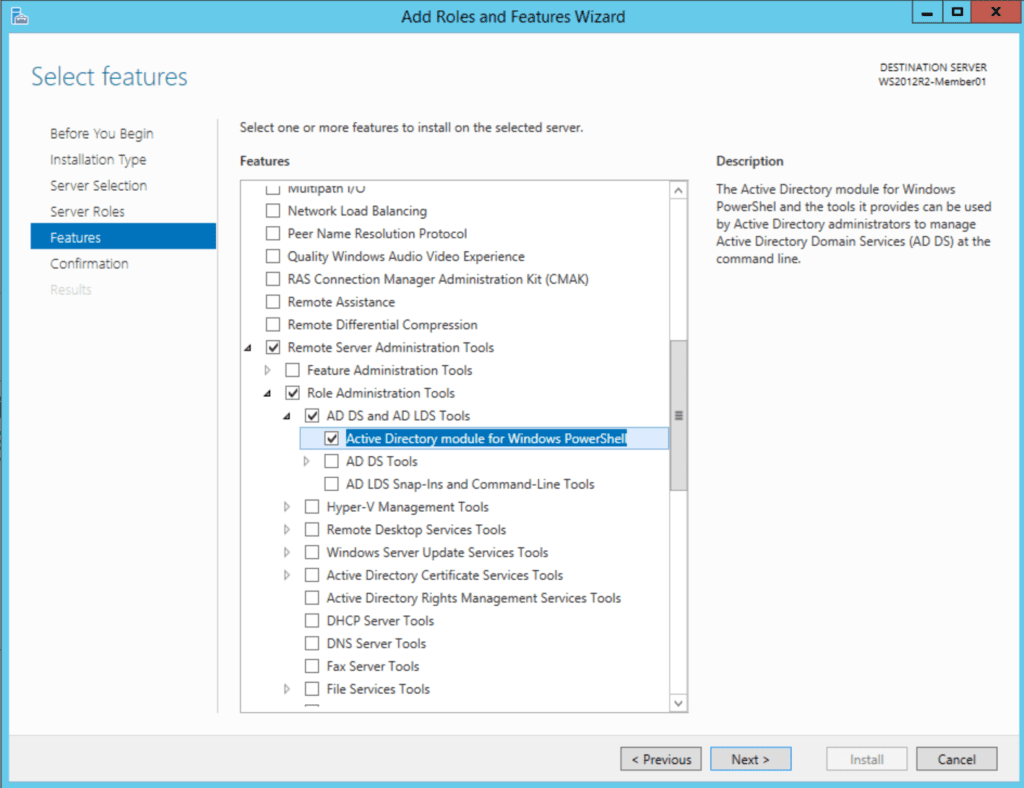
Click Next a few times until you come to the ‘Select features‘ screen. As we’ve done previously, drill down to ‘Remote Server Administration Tools -> Role Administration Tools -> AD DS and AD LDS Tools -> and select Active Directory module for Windows PowerShell.’

Selecting the AD module for Windows PowerShell

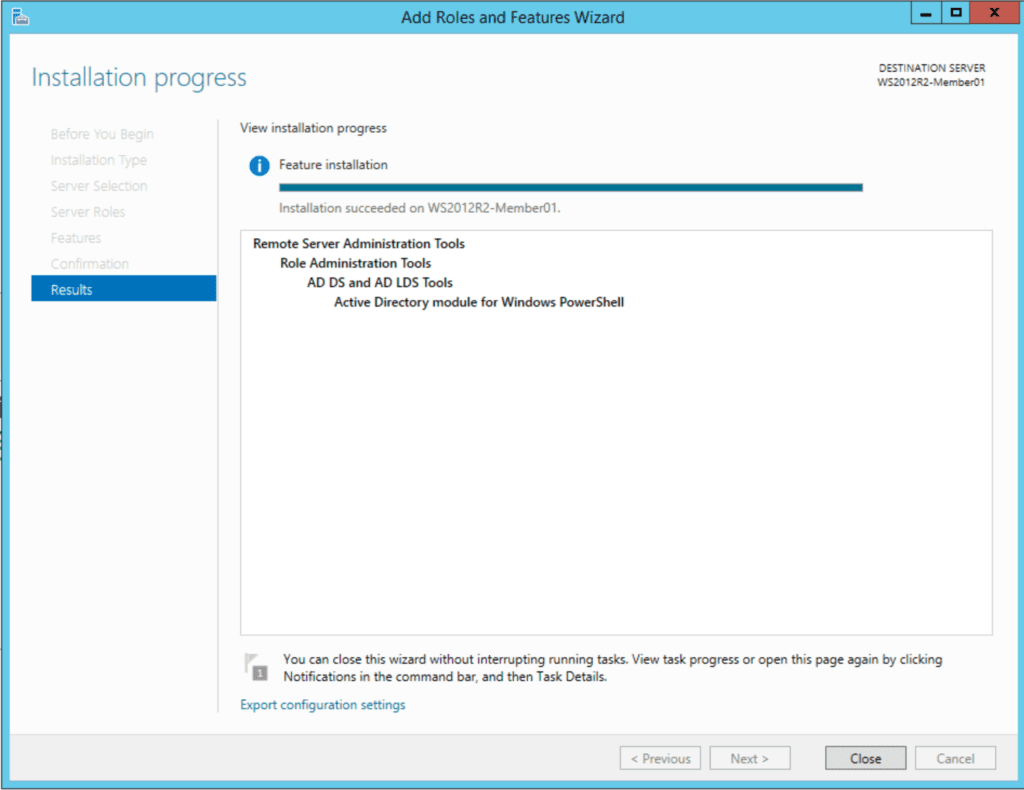
On the next screen, click Install and we’re good!

We've done installing the AD module
Installation succeeded! Let’s fire her up!

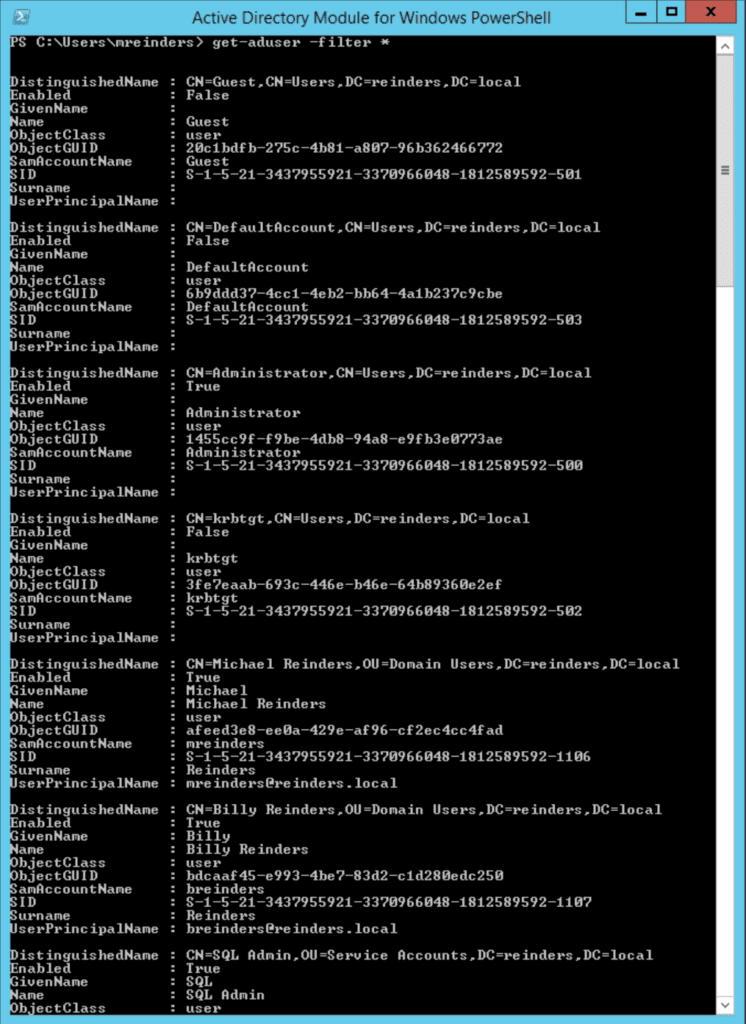
Click Start -> Administrative Tools. Lo and behold, there it is. Open ‘Active Directory Module for Windows PowerShell.’ Let’s use the same Get-ADUser command again.

Get-ADUser -filter *
Running the Get-AdUser command
I know…I probably could have come up with some varying commands, but, you get the idea… 🙂

PowerShell Core 6.0/7.x

There are some other productivity features to help boost your efficiency as an IT Pro. This includes the method to install the Active Directory module on PowerShell Core 6.x/7.x. I’ll demonstrate this here on one of my Windows 10 version 21H2 VMs.

The first step is to install the RSAT tools as described above. You can follow the different steps mentioned in the ‘Windows 10’ section above.

Once you have the tools installed, you can install the latest version of PowerShell Core, which, as I write this, is PowerShell 7.2.5. You can find download links on this page.

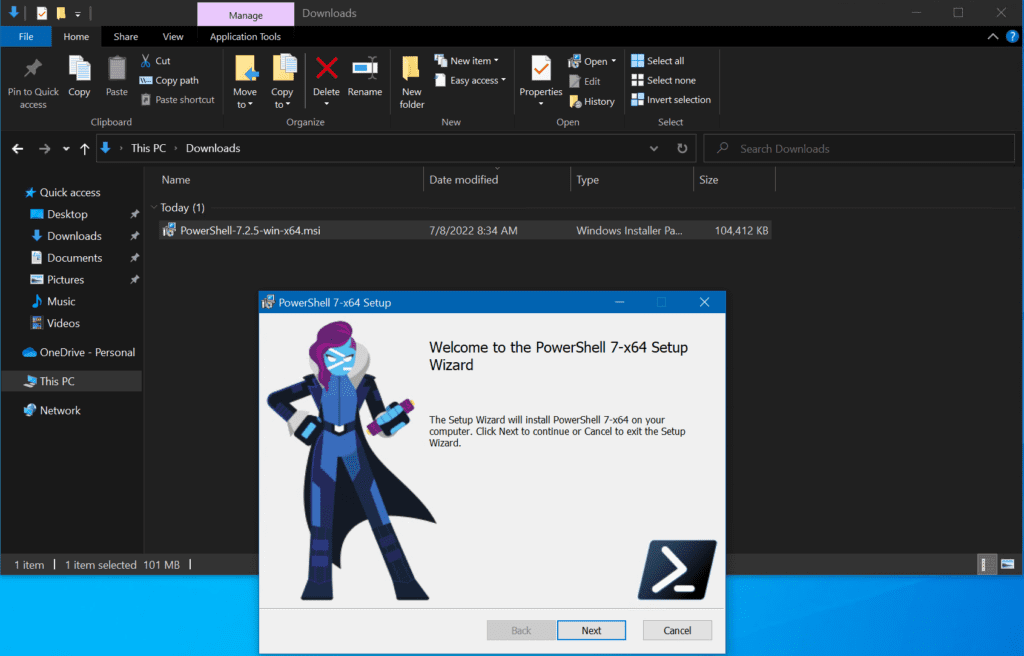
Installing PowerShell (Core) 7.2.5

Click Next after opening the Setup wizard. On the ‘Optional Actions‘ screen, you can see the ‘Enable PowerShell remoting‘ option. Be sure to check that.

Selecting the 'Enable PowerShell remoting' feature
Selecting the ‘Enable PowerShell remoting’ feature

Click Next a few more times and click Install.

Installing PowerShell 7

After it’s installed, you can launch it from the Start menu as an Administrator.

Launching PowerShell (Core) 7 as an administrator

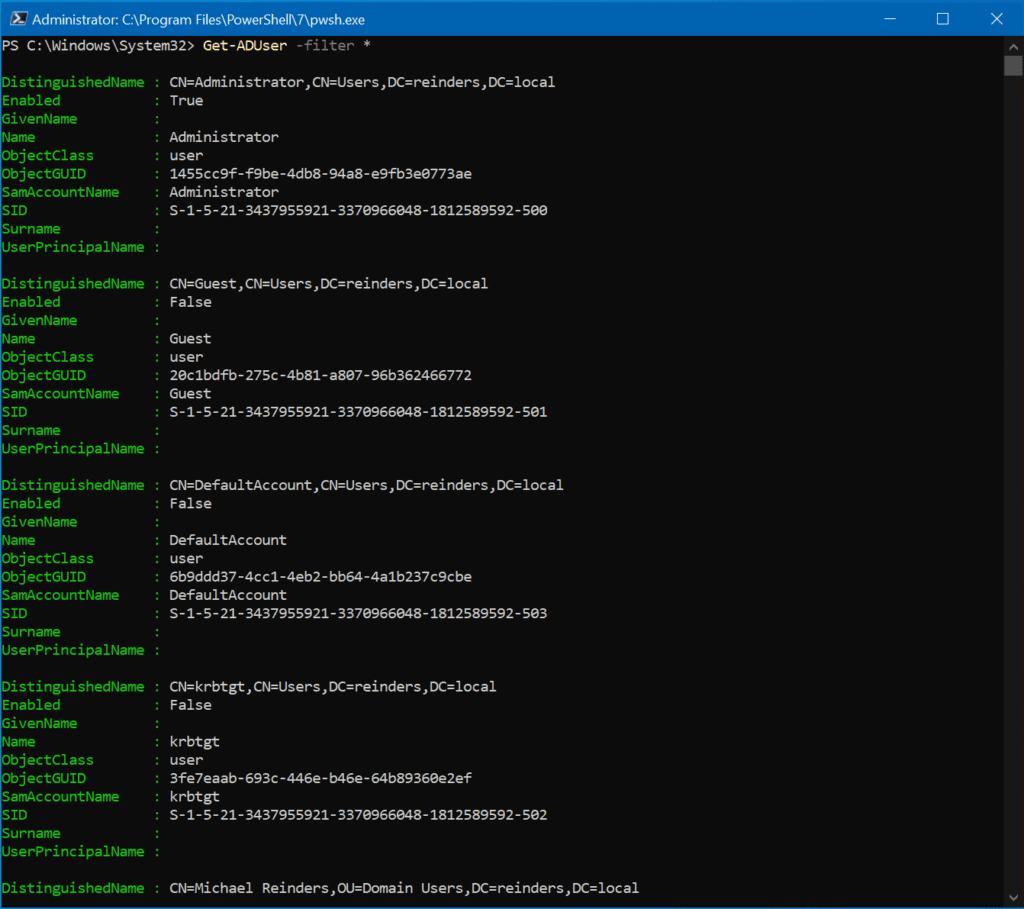
Because the modules installed essentially ‘follow’ the varying versions of PowerShell installed, I was able to use PowerShell (Core) 7.2.5 and run the Get-ADUser command natively.

Get-ADUser -filter *
Running Get-ADUser in PowerShell (Core) 7.2.5
Running Get-ADUser in PowerShell (Core) 7.2.5!

Using PowerShell remoting and interactive sessions

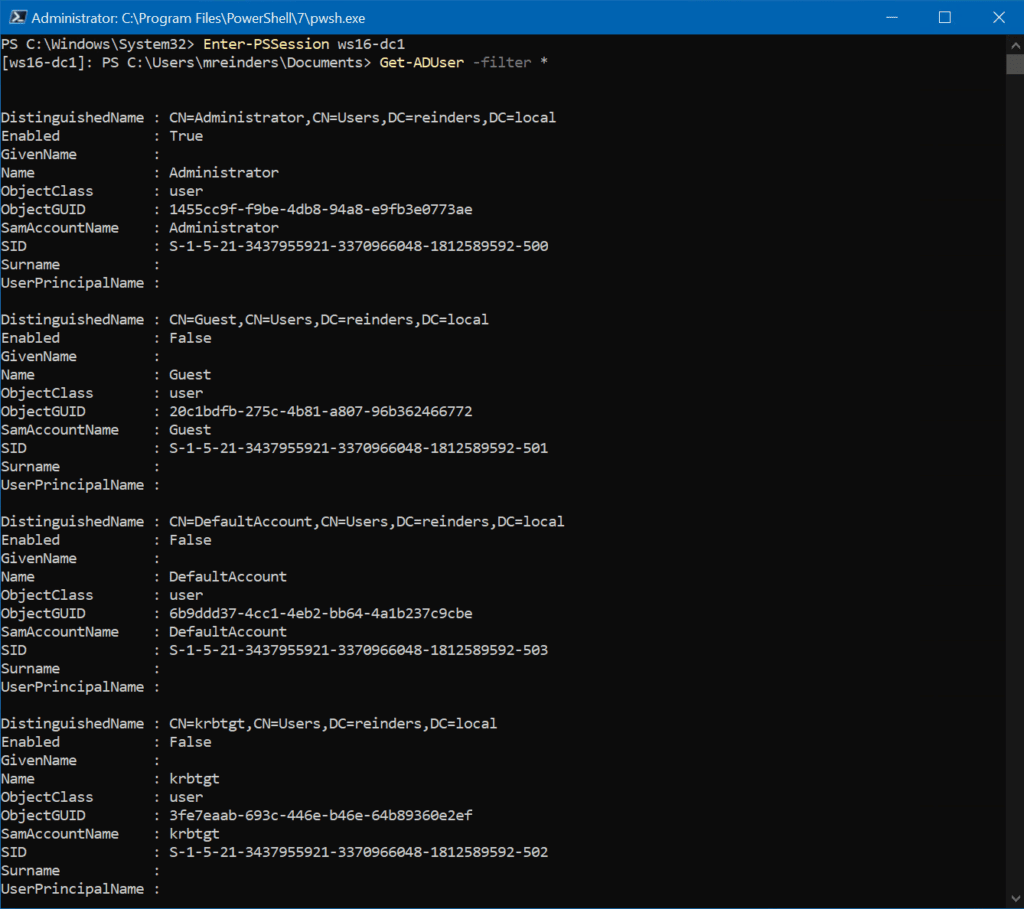
Another pretty powerful feature is being able to start a remote, interactive PowerShell session on your client computer while being connected to one of your domain controllers. Let me demonstrate how to do that with the following command:

Enter-PSsession ws16-dc1
Using Enter-PSsession to remotely run PowerShell on my domain controller
Using Enter-PSsession to remotely run PowerShell on my domain controller!

So, if your IT security folks don’t want the RSAT tools to be installed on your client machine for whatever reason, you can still accomplish your tasks in Active Directory with PowerShell without having to log in to your DCs. Pretty slick trick, right?

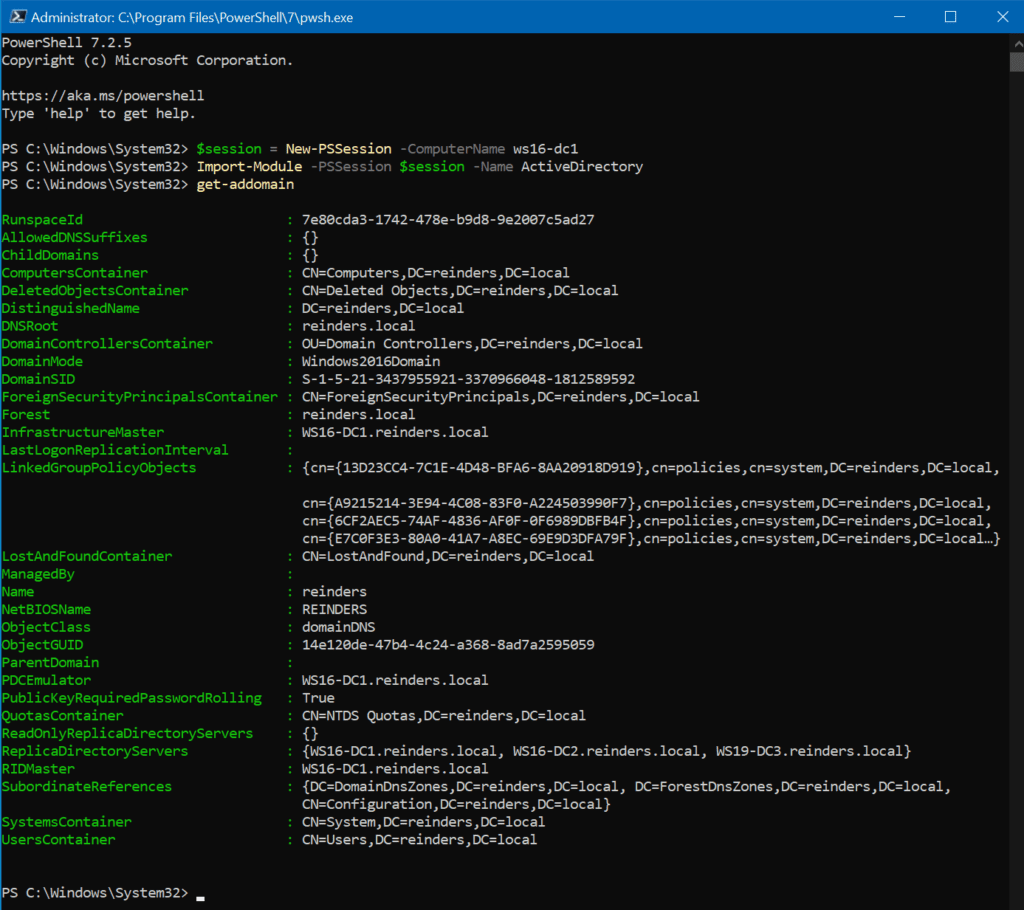
The next option we have is to use what’s called implicit remoting. This allows you to run the AD cmdlets from your local session. However, the commands are run remotely on the DC. Run the following commands to accomplish this.

The first command below starts a PowerShell session on my DC named ws16-dc1 :

$Session = New-PSSession -ComputerName ws16-dc1

The next command imports the Active Directory module from the remote session into our local session:

Import-Module -PSsession $session -name ActiveDirectory
Importing the AD Module from your DC

All the commands you run are literally being processed and running on your domain controller.

Exporting the remote AD module to a local module

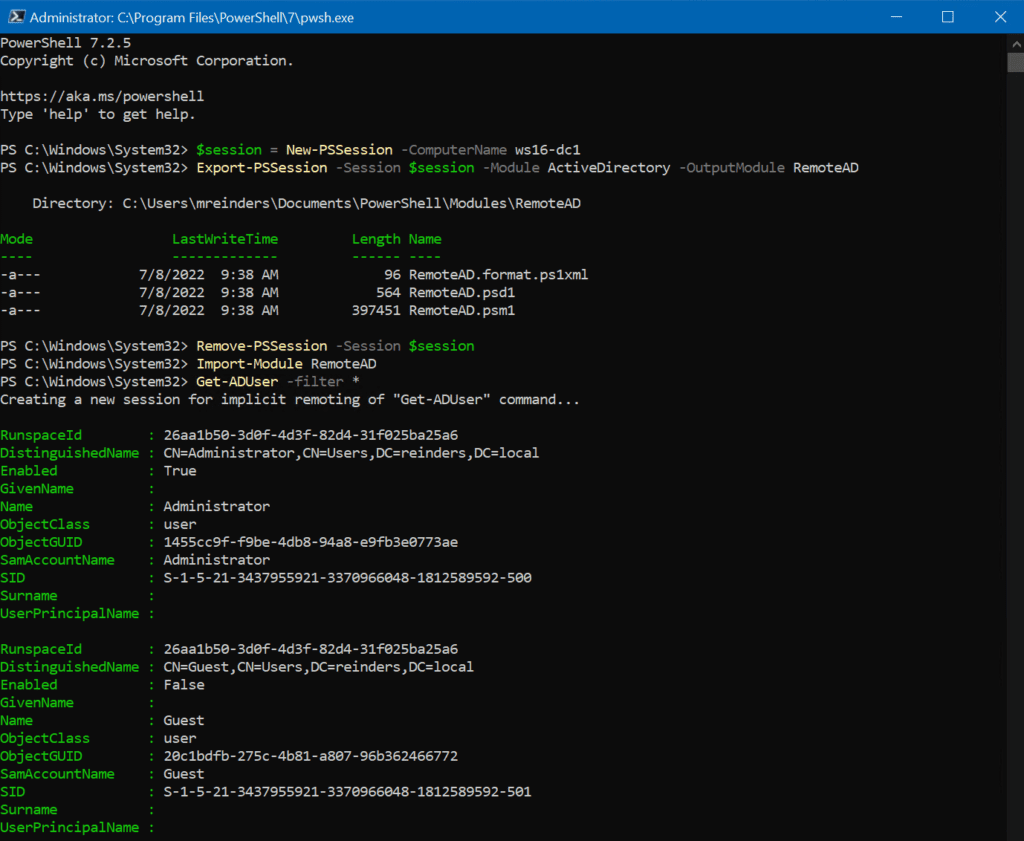
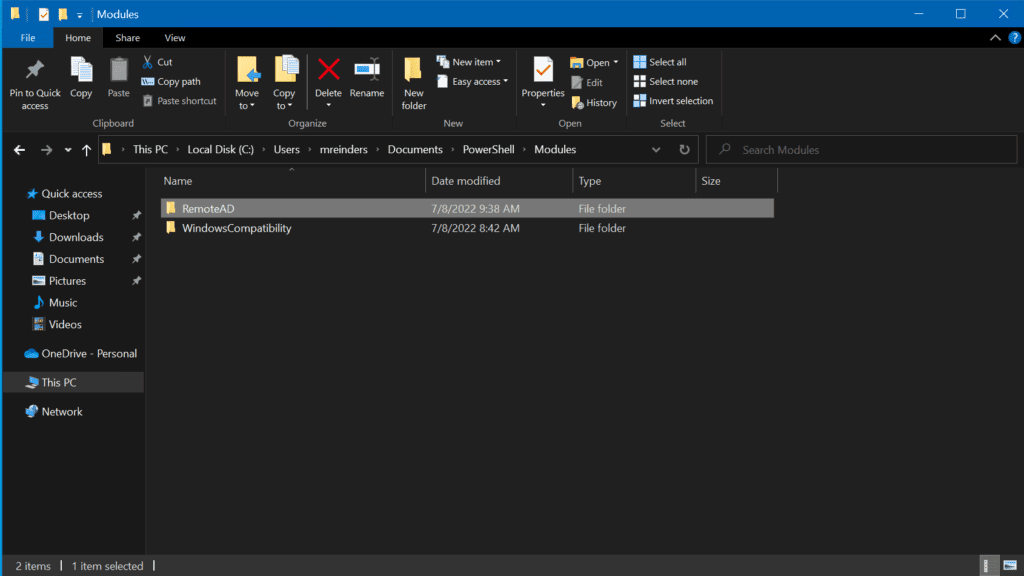
The final task we can accomplish here is to export the AD cmdlets from your remote session to a local module. The sample commands below will accomplish this task by creating a local module in your Documents folder under PowerShell\Modules\RemoteAD.

$session = New-PSSession -ComputerName ws16-dc1
Export-PSSession -Session $session -Module ActiveDirectory -OutputModule RemoteAD
Remove-PSSession -Session $session
Import-Module RemoteAD
Exporting the remote Active Directory module from my DC to my local module

As is the case with the earlier steps we’ve run, we’re once again using implicit remoting, meaning all the cmdlets we use will be running remotely on the domain controller we specify. The local RemoteAD module makes a connection to the cmdlets on the DC.

Bonus tip: If you want to use this RemoteAD module on other client computers, you can copy the RemoteAD folder to the PowerShell Core module folder on other machines.

You can copy any modules listed here to other machines to auto-import them

The difference between these two methods is this – PowerShell only establishes a connection to the domain controller when you use an AD cmdlet the first time. It is a persistent connection. You don’t have to add the above commands to your script or profile because PowerShell will load them automatically. However, be advised that you may need to repeat these steps if and when you update the AD module on your domain controller.

Conclusion

It’s rather refreshing to discover that some procedures IT pros need to go through are quite straightforward. Thank you, Microsoft for keeping the overall process of installing this Active Directory module for PowerShell pretty streamlined and consistent over the last ten years! Every little bit helps.

Thanks to posts like these, if you need to grab your DeLorean and go back in time, you’ll have everything you need to get your job done. Thank you for reading, and please feel free to leave any comments or questions down in the comments section below.

Read the whole story
jshoq
891 days ago
reply
I find having the Active Directory module a necessary installation for management of legacy services that utilize service accounts from within Active Directory. This is helpful to get the module installed due to the additional installations the module needs.
Seattle, WA
Share this story
Delete

What is IP Address of Azure DevOps Build Agent and Set Firewall to Allow it

1 Comment and 2 Shares

If you are using the Microsoft-hosted Azure DevOps Build Agents, then you wont really have a reliable way to know what IP Address traffic from the Build Agent will originate from. This can be an issue when firewalls may be blocking the necessary traffic from your deployments to perform actions on your resources. Thankfully, the […]

The article What is IP Address of Azure DevOps Build Agent and Set Firewall to Allow it appeared first on Build5Nines.

Read the whole story
jshoq
895 days ago
reply
This is a super handy piece of code to keep restricted access to Azure services but allow it for Azure DevOps Pipelines or GitHub Actions. I plan to check this out for my own work.
Seattle, WA
Share this story
Delete

Netflix chooses Microsoft as an ad-tech partner for its coming ad-supported subscription service

1 Comment
Microsoft's ad platform will serve up all ads on the coming Netflix ad-supported subscription service, the pair have announced.
Read the whole story
jshoq
896 days ago
reply
Huh???
Seattle, WA
Share this story
Delete
Next Page of Stories